Lux Lox Salon – 36-Week Advanced Training Guide
Overview
This comprehensive 36-week program transforms newly licensed cosmetologists into confident, independent stylists at Lux Lox Salon. As a beauty professional in our program, you will engage in structured weekly learning with a balance of self-study, hands-on practice on models, and business-building education. Each week outlines specific objectives, learning resources (video tutorials, guides), practical assignments, and model sessions to reinforce skills. The curriculum emphasizes self-directed learning – you’ll take initiative in accessing resources and tracking your progress – and deliberate practice over time to build mastery. By the end of week 36, you will have honed advanced cutting, coloring (with Oligo Professionnel products), styling techniques, and salon business skills, preparing you to smoothly transition from assistant to independent stylist. Below is a week-by-week breakdown with topics, resources, and assignments. Let’s get started!
NOTE on Time Commitment & Milestones: Each week, plan to spend approximately 2 hours on assigned video tutorials, 4 hours on mannequin practice (or more if needed), plus 1 “model day” (usually Tuesday) to work on a live model or client.
To help measure progress, we include suggested performance milestones. For example, by Week 4, aim to complete a classic blowout in 30 minutes or less, down from the 45-minute baseline in Week 1. Continue setting similar concrete goals (e.g., color application speed, scissor-over-comb consistency) so you can track and celebrate improvements.
Additional Speed & Efficiency Benchmarks (Integrated Suggestion): Throughout the program, set clear timing goals for other services. For example, aim to complete a basic one-length haircut in 30 minutes by the end of Week 4; achieve a root retouch application in about 15 minutes by Week 14; place a partial highlight in 45 minutes by Week 16. These benchmarks mirror real salon timing demands.
Because real model availability can fluctuate, you may need to adapt your schedule. Aim for at least one to two real models per major skill segment—while also using mannequins, friends, or family if a formal “Model Day” is not possible.
Model Recruitment Best Practices:
Post on local community boards or social media (Instagram, Facebook groups) stating you’re a student at Lux Lox seeking hair models.
Offer a discounted or complimentary service in exchange for their time and honest feedback.
Request specific hair types or textures you need more practice on (e.g., thick curly hair, short pixie, heavily color-corrected hair).
Coordinate with the salon’s front desk: they may refer select clients who are open to model experiences.
Keep a simple sign-up or spreadsheet so you can schedule models efficiently without overbooking.
NOTE on Ergonomics & Self-Care: From Week 1 onward, pay close attention to proper posture, station setup, and tool handling. This helps prevent repetitive strain injuries common in the beauty industry.
Incorporate short stretching routines for wrists, shoulders, and lower back between services.
We encourage you to schedule brief daily stretch breaks or mindful movement sessions throughout the entire 36-week timeline—ideally at the start of the day, between services, and before you leave. This proactive approach to ergonomics supports long-term career health and comfort.
Additional Retail Micro-Goals: To build confidence in recommending products from the very start, incorporate weekly retail mini-challenges. Examples:
Week 1: Recommend at least one styling aid (e.g., heat protectant) to your blowout model.
Week 2: Suggest a finishing product (e.g., serum or hair spray) after your iron styling.
Continue expanding these recommendations, aiming to share at least one product benefit with every client or model each week. Track how many times you do this and note any questions or objections clients raise.
Week 2: Client Consultation & Communication
Focus: Develop strong consultation skills and professional communication. Learn how to conduct a thorough (7 Salon Client Retention Strategies You Should Be Using) consultation to determine needs and manage expectations, and practice using positive language and active listening with clients.
Learning Resources:
Watch “HOW TO DO A GREAT CONSULTATION | Hairdresser Tips” by Sam Vay (The BEST Method to Keep Your Salon Clients Coming Back) which covers how to engage the client, ask the right questions, and confirm understanding.
Also view “Client Consultation Masterclass” (Glassbox Barbershop) for an 8-step framework on effective consultations (this is barber-oriented but the principles of listening and clarity apply to all).
Self-Learning:
Review the Client Communication & Service Scripts section of the handbook (Sect (Client Retention Success in the Hairdressing Industry - TikTok) examples of greetings and consultation dialogue. Memorize a simple consultation structure: greet warmly, ask open-ended questions about the client’s hair history and goals, echo back what you heard (“So you’re looking for...”), then make a recommendation. Role-play this flow with a classmate or friend, taking turns as stylist and client.
Hands-On/Role-Play:
Pair up with another assistant or friend and conduct a mock consultation. Use a scenario (e.g., client wants a big change but is nervous). Practice using reflective listening (“I hear that you...”), suggesting an option, and explaining the maintenance of that service. Pay attention to body language (yours and the “client’s”).
On-Site Practice:
This week during model or client interactions, focus on consultation at the start of the service. With your model (even if just a blowout service), practice the habit of discussing what they want and confirming it back. Have your mentor observe if possible, and give you feedback on how well you listened and guided the conversation.
Reflection:
Write down the key consultation questions you want to ask every client (for example: “What do you like/dislike about your hair currently?”). Also note any phrases from the scripts or videos that you found effective (e.g. how to phrase a tactful suggestion). These will form your personal consultation checklist. Good communication and trust are the foundation of client retention, so these skills are critical moving forward.
Additional Retail Micro-Goal Suggestion: This week, practice introducing at least one take-home product early in the consultation if you foresee a need (e.g., “Because we’re planning a smoothing service, I recommend you use our salon’s sulfate-free shampoo at home.”).
Advanced Consultation Challenges (Integrated Suggestion): Consider scheduling a “Consultation Role-Play Day” mid-way through the curriculum (around Week 8 or 9). Create scenarios involving:
Color correction with budget constraints
Clients who want a dramatic change but are unsure of commitment
Clients with highly textured hair seeking partial relaxer or smoothing
Unclear expectations or unrealistic inspo photos
This extra practice prepares you for more complex consultations later in the program.
Detailed Step-by-Step Process: Conducting a Client Consultation
Greeting & Introduction
Approach the client with a warm smile.
Introduce yourself by name and confirm the client’s name.
Assessment of Wants & Needs
Ask open-ended questions: “How do you feel about your current style?” “What do you hope to achieve today?”
Listen attentively without interrupting.
Hair History & Lifestyle
Inquire about previous chemical services, home-care routine, and styling preferences.
Confirm if there are any scalp or hair concerns, allergies, or sensitivities.
Clarify & Recap
Restate the client’s goals to ensure understanding: “So you’d like a shoulder-length cut with face-framing layers?”
Check for agreement or corrections.
Professional Input
Offer your professional opinion, considering their face shape, hair type, and maintenance.
Suggest alternatives or enhancements if relevant.
Confirm Plan
Finalize the plan: “We’ll do a layered cut with subtle highlights around your face to add brightness.”
Discuss pricing, time, and maintenance requirements.
Set Expectations
If the desired look is not fully achievable in one session, explain that (“We may need two sessions to lighten safely.”).
Emphasize aftercare or recommended products.
Proceed or Adjust
Once agreed, proceed with the service.
If the client seems unsure, offer a small test or transitional option.
Documentation
Make notes of formulas, details, or special preferences in your client record.
Week 4: Orientation & Blow-Dry Basics
Focus: Welcome to Lux Lox Salon! Learn about our salon culture, service standards, and basic hair finishing skills. This week introduces professional shampooing, conditioning, and performing a classic blowout with a round brush.
Learning Resources:
Watch “How To Shampoo Your Client | Step-By-Step” by Wholy Hair on YouTube for a step-by-step salon-shampoo tutorial (proper draping, thorough rinse, scalp massage technique, emulsifying shampoo, conditioner on mid-lengths to ends, and gentle towel wrap).
Watch “3 Ways To Blow Dry Hair To Achieve Various Degrees of Volume” by Sam Villa Hair Tutorials on YouTube for a step-by-step blow-dry tutorial (off base, half off base, and on base round-brush placement for customizable lift).
Self-Learning:
Set up your training journal (or Google Doc) to record weekly goals and reflections.
Review a diagram of head shape/hair anatomy to understand sectioning.
Practice proper shampoo and scalp massage techniques on a mannequin, following guidance from a senior stylist.
Hands-On Practice:
On a mannequin, perform a basic round-brush blowout. Focus on sectioning, tension, nozzle control for a smooth finish. If you have different brush sizes or a blow-dry brush tool, experiment with them to see their effect on volume and curl.
On-Site Model Day (Tue):
Shampoo and blowout a live model (client or friend) under your trainer’s supervision. Emphasize client comfort (water temperature, scalp massage pressure) and achieving a bouncy, frizz-free blowout. This bridges theory to practice in a real scenario. Your mentor will give immediate feedback – note their suggestions in your journal.
Reflection:
Write a brief reflection on what you learned about Lux Lox’s standards and your blow-dry technique. Identify one strength and one area to improve (e.g. “Blowout took 45 minutes, aim to reduce to 30 by Week 4”). Setting these improvement goals will guide your practice.
Additional Retail Micro-Goal Suggestion: In Week 1, specifically practice suggesting a heat protectant product to your model or friend as part of the blow-dry routine. Log any questions they ask in your journal.
Detailed Step-by-Step Process: Classic Round-Brush Blowout
Preparation
Drape your model and ensure they are comfortable at the shampoo bowl.
Detangle hair thoroughly before shampooing to avoid tangles during the blowout.
Shampoo & Conditioning
Wet hair completely using comfortable water temperature.
Apply shampoo, focusing on the scalp. Gently massage using small, circular motions.
Rinse thoroughly, then apply conditioner primarily to mid-lengths and ends.
Rinse again and gently blot excess water with a towel.
Sectioning
Divide hair into four main sections: top/crown, two sides, and back.
Use sectioning clips to keep each area separate and manageable.
Pre-Dry
Using the dryer without a brush, remove 60–70% of moisture while directing hair in the general shape you want (forward, back, etc.). This speeds up the process and reduces styling time.
Round-Brush Technique
Start at the nape: take a small subsection, place the round brush at the roots, and direct airflow from roots to ends.
Slowly rotate the brush to create tension, pulling hair taut while following with the blow dryer nozzle close (but not too close to burn hair or scalp).
Use consistent tension and maintain the dryer’s nozzle pointing downward to smooth the cuticle.
Roll the brush up toward the scalp to create volume; pause with heat, then cool-shot to set the shape before unwinding.
Move Through Sections
Work upward through the back, then the sides, finishing with the top/crown.
Over-direct subsections forward or upward if you want added volume near the root.
Finishing
Once the hair is fully dry, do a final pass at the ends or fringe area if needed.
Optionally, set the style with a lightweight hair spray or serum for shine.
Client Comfort & Efficiency
Check in with your model about heat levels or comfort.
Aim for a consistent, methodical approach so that your blowout time improves naturally with practice.
Evaluate
Use a mirror to see if the volume and smoothness are consistent all around.
Note any areas that are still frizzy or damp and refine those sections.
| Rubric: Blow-Dry Fundamentals | Level 1 (Needs Work) | Level 2 (Developing) | Level 3 (Proficient) | Level 4 (Advanced) |
|---|---|---|---|---|
| Preparation (Station & Client Setup) | Unorganized station, minimal draping, client uncomfortable | Station partially ready, draping incomplete | Station tidy & prepared, client draped correctly | Exceptionally organized & sanitary; client comfort evident |
| Sectioning & Tension | Irregular sections, inconsistent tension | Some sections neat but tension occasionally off | Sections consistently clean, tension generally correct | Perfectly parted sections, tension precisely consistent |
| Brush & Dryer Control | Frequent tangles, nozzle placement incorrect | Some tangling or poor nozzle control | Smooth technique, controls nozzle close to brush | Effortless brush/dryer coordination, minimal frizz or tangles |
| Timing & Efficiency | Took >45 minutes for a basic blowout | Completed in ~45 minutes but with some idle time | Completed in ~35 minutes with minimal downtime | Completed in ~30 minutes or less with maximum efficiency |
| Finish Quality | Hair still damp, frizzy or uneven volume | Mostly dry but minor frizz or uneven sections | Smooth finish with good volume, minor detail refinements | Salon-ready polish: bouncy, frizz-free, even volume |
| Client Interaction | Poor communication, minimal comfort checks | Occasionally checks on comfort/heat but not consistent | Regularly checks water/heat comfort, professional chatter | Warm, engaging, thorough checks on comfort, fosters great rapport |
Short Quiz: Blow-Dry Basics
True or False: It’s best practice to rough-dry the hair about 70% before using a round brush.
Multiple Choice: When sectioning for a blowout, you should generally:
- A. Skip sectioning to save time
- B. Use very large sections to finish faster
- C. Divide hair into manageable sections for consistent tension
- D. Only section at the top and ignore the back
Short Answer: List two benefits of using a nozzle attachment on the hairdryer.
Learning Resources:
Watch “Volume Blowout | Salon Blow Dry Tutorial” by Styles By Summer (YouTube) for advanced round-brush techniques to achieve maximum volume. Then watch Sam Villa’s 6 Ways to Curl Hair tutorial for professional curling iron and flat iron techniques (ribbon curls, S-waves, spirals, etc.) – this shows proper sectioning and curl types.
Week 5: Styling Tools & Finishing Techniques
Focus: Master the use of heat styling tools and finishing products to create polished looks. Learn to section hair for styling, curl with an iron, smooth with a flat iron, and apply products for hold and heat protection.
Self-Learning:
Get familiar with our salon’s styling toolkit: identify different brush types (round vs paddle), hot tools (various curling iron sizes, flat iron), and key products (thermal protectant, volumizing mousse, hair spray, serum). Research appropriate heat settings for different hair types and take notes (e.g. fine vs coarse hair).
Hands-On Practice:
On a mannequin, practice doing a smooth straight style with a flat iron and then a basic curl set with a curling iron. Try at least two curl techniques from the Sam Villa video (e.g. horizontal vs vertical iron placement for different curl shapes). Experiment with finishing products – for example, use texturizing spray on one side and serum on the other to feel the difference in finish.
On-Site Model Day (Tue):
Perform an iron style on a model. For instance, give your model a voluminous blowout finish with curls at the ends. Incorporate what you learned: use section clips to stay organized, and apply a heat protectant before styling. After styling, apply a light hair spray for hold and a shine spray for luster.
Reflection:
Note which tool or technique you found most challenging and research a tip to improve it. For example, if your curls were uneven, ask a men (The BEST Method to Keep Your Salon Clients Coming ... - YouTube) adjust your wrist motion or iron angle. Document these tips in your journal for future reference.
Additional Retail Micro-Goal Suggestion: In Week 2, focus on recommending finishing products (like a light-hold hair spray or a smoothing serum). Try to share one product tip with your model and record their response.
Detailed Step-by-Step Process: Curling with an Iron
Hair Prep
Ensure hair is fully dry and detangled.
Apply a heat protectant spray or cream throughout.
Sectioning
Create horizontal partings from nape up to crown, plus side sections.
Clip away each section to maintain control.
Iron Selection
Pick an iron size suitable for desired curl type: 1" for tighter curls, 1.25" or larger for loose waves.
Set the iron temperature according to hair type (lower for fine or damaged hair, higher for coarse hair).
Curling Technique
Take a 1" (or desired thickness) subsection.
Place the iron near roots (without touching the scalp) and wrap the hair around the barrel or use the clamp.
Hold for 5–10 seconds (depending on hair density and iron heat).
Gently release; avoid tugging the curl out.
Curl Direction
Alternate curl directions (away from face vs. toward face) for a more natural look.
For a polished look around the face, curl everything away from the face.
Cool & Set
Allow each curl to cool in its shape or pin it if you desire more hold.
After all sections are curled, gently run fingers or a wide-tooth comb through to blend.
Finishing
Mist with a light-hold spray for flexible control.
Add a serum or shine spray to ends if desired.
Check Work
View curls from all angles in the mirror.
If any curl appears loose or frizzy, refine that section.
| Rubric: Consultation Excellence | Level 1 (Needs Work) | Level 2 (Developing) | Level 3 (Proficient) | Level 4 (Advanced) |
|---|---|---|---|---|
| Greeting & Rapport | Ignores client’s name or comfort, little warmth | Basic greeting but minimal rapport building | Friendly introduction, addresses client by name, tries to ease nerves | Warm, personalized greeting, actively sets a comfortable, trusting atmosphere |
| Listening Skills | Interrupts client, doesn’t clarify wants | Listens but no follow-up questions | Listens carefully, repeats key points to confirm understanding | Masterful active listening, clarifies details, repeats & rewords to ensure 100% clarity |
| Asking Open-Ended Questions | Uses only yes/no questions, misses details | Some open-ended queries but not thorough | Several open-ended questions (hair history, lifestyle), obtains adequate info | Comprehensive use of open-ended Qs, deeply uncovers lifestyle, hair goals, prior experiences |
| Expectation Management | Makes unrealistic promises, no mention of maintenance or cost | Briefly mentions upkeep but no detail | Clearly explains what is achievable, the approximate cost, and upkeep | Sets realistic goals, discusses budget/time thoroughly, provides alternative solutions |
| Solution & Confirmation | No clear plan, jumps into service without verifying | Vague plan, partial confirmation | Proposes a clear plan, checks with client if they agree or have concerns | Delivers multiple solutions with pros/cons, obtains enthusiastic client agreement |
Short Quiz: Consultation
True or False: Reflective listening is repeating back the client’s words to ensure understanding.
Multiple Choice: Which question is the best example of an open-ended consultation query?
- A. “You want it shorter, right?”
- B. “What do you like or dislike about your current haircut?”
- C. “Will you want a bob today?”
- D. “You don’t like layers, correct?”
Short Answer: Why is managing a client’s expectations important before starting a color correction?
Week 4: Haircut Fundamentals – One-Length Cuts
Focus: Learn fundamental haircut geometry by mastering a one-length (blunt) haircut. This classic technique builds your precision handling of shears, sections, and consistent tension.
Learning Resources:
Watch “HOW TO CUT A ONE LENGTH HAIRCUT | Step by Step” by Kat Craig on YouTube (approx. 12 min). This tutorial demonstrates sectioning the hair into quadrants, proper posture, finger position, and cutting a blunt line across various lengths. Note how the stylist checks for balance on both sides.
Self-Learning:
Review the Sassoon ABC Cutting – “Line” technique in our resources (the “A” in ABC is a one-length line). Understand that precision and consistency are key – each section should be cut with the same elevation (ideally 0° for a blunt cut). Practice holding your shears and comb correctly: palm your shears when combing, and keep your cutting hand steady.
Hands‑On Practice:
Using a mannequin with shoulder‑length hair (or longer), perform a straight one‑length trim. Start at the center‑back nape, establish your guideline, and work outward to each side. Use clips to keep sections clean and controlled. After finishing the back, move to the sides, carefully matching each side to the original guide length. Constantly cross‑check by combing the hair straight down and confirming that the ends meet evenly. Keep your comb perfectly horizontal and maintain consistent tension in every section.
On‑Site Model Day (Tue):
If you have a live model who needs a trim, perform a precise blunt cut under your mentor’s supervision. If no live model is available, continue refining the technique on a mannequin and ask your mentor to evaluate at least one completed section and provide feedback. Pay close attention to your body position—make sure you’re at eye level with the area you are cutting, as this alignment greatly affects accuracy.
Reflection:
Examine the cut you did – are the ends perfectly even? If not, identify where it’s uneven (e.g., left side longer) and why (perhaps your finger angle shifted). Write down what to adjust next time, such as “check balance after each section.” Mastering a straight line haircut is fundamental to more advanced cuts.
Additional Speed & Efficiency Benchmark: By the end of Week 4, aim to complete a basic one-length trim (e.g., removing 1–2 inches) in about 30 minutes total—while maintaining your precision.
Detailed Step-by-Step Process: One-Length Blunt Haircut
Preparation
Shampoo and towel-dry the mannequin or model.
Comb through gently to remove tangles.
Decide on the desired length and clarify with model if needed.
Sectioning
Create four quadrants: part the hair down the middle from front to back, then ear to ear.
Secure each section with clips.
Establish Guideline at the Nape
Release the back-left quadrant.
From the bottom hairline, take a 1/2-inch horizontal subsection.
Comb hair down at natural fall with consistent tension.
Cut a straight line at the chosen length. This is your guide.
Work Through the Back
Continue taking horizontal subsections, each 1/2 inch thick.
Comb hair to the same elevation (0°, natural fall) and cut at the guide.
Repeat on the right side of the back, matching the guide in the center.
Check for Balance
Step back and visually check that both sides meet in the center.
Make small adjustments if one side is slightly longer.
Move to the Sides
Release the front quadrants one side at a time.
Comb down the side section at natural fall, matching the length to the back guide.
Use the hair from the back as a reference to ensure a continuous blunt line.
Final Cross-Check
Comb sections from different angles (straight down, slightly forward) to ensure no uneven spots.
Make micro-trims as needed.
Style & Refine
Blow-dry straight if hair is damp to confirm the perimeter is even.
Double-check the line once dry, refining any uneven edges.
| Rubric: One-Length Haircut | Level 1 (Needs Work) | Level 2 (Developing) | Level 3 (Proficient) | Level 4 (Advanced) |
|---|---|---|---|---|
| Sectioning & Guide | Guide not clear, sections messy, no consistent reference | Attempts to set guide but loses it, some inconsistent partings | Guide established well, mostly consistent partings | Perfect guide, parted precisely, always cross-checking each section |
| Elevation & Tension | Varies drastically, causing uneven perimeter | Occasionally lifts hair too high, some tension errors | Maintains near 0° elevation, tension mostly consistent | Exceptional control—0° maintained meticulously for a sharp line |
| Line Consistency | Noticeable dips, corners, or overhang | Some uneven spots but mostly fixable | Perimeter is mostly even, minor refining needed | Perfectly even line across entire perimeter, no dips/bumps visible |
| Cross-Checking | Does not cross-check or fix errors | Quick cross-check, some missed areas remain | Cross-check performed thoroughly, few errors remain | Multiple cross-check methods (vertical, horizontal) used; no errors left |
| Finishing (Dry Check) | Skips final check once hair is dry | Brief check, minor unevenness persists | Dry check done, perimeter refined as needed | Meticulous final check in mirror from all angles, truly polished finish |
Short Quiz: One-Length Blunt Cut
Multiple Choice: What is the recommended elevation for a true one-length cut?
- A. 45°
- B. 0°
- C. 90°
- D. Overdirected
True or False: Cross-checking typically involves looking at the haircut horizontally after cutting vertically.
Short Answer: Name one reason why tension consistency is crucial for a blunt haircut.
Week 5: Layering Techniques – Long Layers
Focus: Learn how to add long layers to create movement while preserving length. This week builds on your blunt cutting by introducing elevation and cutting angles for layered shapes.
Learning Resources:
Watch “Seamless Layered Haircut Tutorial – Classic 90° Long Layers” (Free Salon Education, Matt Beck). This video shows how to section for layers, elevate hair to 90° from the head, and use traveling guides for even layering. Notice how the stylist “over-directs” sections in the front to maintain length toward the face.
Self-Learning:
Revisit head shape diagrams and visualize how elevating hair creates layers: lifting hair straight out (90°) removes weight and creates a diffuse line. Read the Haircutting Basics section of the handbook if available. Memorize terms: guideline (guide), elevation, over-direction. Think about how long layers differ from one-length: the ends won’t form one blunt line but rather stagger.
Hands-On Practice:
On a mannequin with long hair, create long layers. Use the “uniform layered” technique from the video: Divide hair into a radial section (ear to ear) and a profile section (down the middle). Start at the top/back, take a section and elevate it 90°, cut a bit of length off (e.g. 1 inch) to create your guide. Continue taking adjacent sections, always bringing some of the previously cut hair as your guide. Work your way through the back and then the sides. Remember to over-direct the front sections slightly back to keep more length toward the front.
On-Site Model Day (Tue):
Practice partial layering on a model if a full haircut isn’t needed – for example, layer just the top crown area on a long-haired model to create volume while keeping their length. Explain to your model what layering does (adds movement without sacrificing overall length) to practice client communication about technical services. Have your mentor watch how you section and guide you if your elevation or finger angles need adjustment.
Reflection:
Layers can be tricky – note any trouble you had (common ones: losing your guide, uneven elevation leading to one side heavier). In your journal, record how you verified your work (did you cross-check vertically and horizontally?). If sections looked choppy, consider if you need to improve your point-cutting or if weight distribution is off. Plan to revisit those points in future haircuts.
Detailed Step-by-Step Process: Classic Long Layers at 90° Elevation
Preparation
Start with clean, damp hair.
Comb through thoroughly.
Sectioning
Create a center part from the front hairline to the nape.
Section ear to ear across the crown if desired to handle front/back separately.
Establish Guide at the Top
Take a vertical slice at the top/crown area.
Elevate to 90° from the head and decide how much length you want to remove.
Make a clean cut to set your initial guide.
Follow the Guide
Move in vertical or pie-shaped sections around the head, always bringing a bit of the previously cut section as a traveling guide.
Keep consistent elevation (90°) and finger angle.
Sides & Front
Over-direct front sections slightly back if you want to maintain face-framing length.
Keep checking your guide to ensure uniform layering.
Cross-Check
Switch to horizontal partings in the top area to see if the layers are even.
Refine any longer pieces.
Perimeter
Revisit the perimeter/outline if needed to blend the layers with the bottom edge.
You can point-cut or blunt-cut the perimeter as desired.
Styling
Blow-dry with a round brush to see how layers fall.
Use finishing techniques (point cutting, texturizing) if needed to remove bulk or add softness.
Evaluate Movement
Check from multiple angles to ensure a balanced shape and that the layering meets the client’s request for volume or movement.
Week 6: Advanced Haircut – The Classic Bob
Focus: Execute a classic bob haircut, a foundational salon shape that builds precision and introduces graduation (shorter in back, longer in front). Focus on clean lines and (Commission vs Booth Rental :: The Pros and Cons of Each) (Booth Rental vs Commission: Which Is Best for a Cosmetologist?)n the nape area.
Learning Resources:
Watch “Graduated Bob Haircut | Vidal Sassoon Inspired” by The Life of Hair on YouTube. This tutorial demonstrates creating a precise bob with slight graduation at the nape (using horizontal sections with a small elevation) and how to refine the perimeter line. Pay attention to how the stylist positions the client’s head forward to cut the nape – this helps create that gentle graduation.
Self-Learning:
Study the difference between a one-length bob and a graduated () ()* involves cutting the underneath sections slightly shorter (with elevation) and the top sections slightly l () ()ng in an angled undercut that makes the hair hug the neck. Review handbook Section 5.3 or 5.5 if it covers “Technical Training & Extra Practice” for cutting – there may be checklists for bob haircuts.
Hands-On Practice:
On a mannequin, map out a bob cut at about chin length. Section as follows: part off a horizontal strip at the very bottom of the nape (about 1 inch high) – this will be your first guide. Cut this guide to the desired length, using slight graduation (elevate maybe 5–10°) for softness. Continue working up the head in 1-inch horizontal sections. As you reach the occipital, lightly over-direct the sides toward the back to preserve a bit more length toward the front (classic A-line bob shape). After cutting, comb the hair in natural fall and check the line – refine any unevenness by point cutting.
On-Site Model Day (Tue):
If you have a bob-length model, perform a trim or bob reshape with mentor supervision. If not, have your model from Week 5 return and reshape their long layers into a long bob (if they consent to losing length). The goal is to practice adapting a cut to a real person’s head shape and hair density. Bobs require consistency on both sides, so use a mirror to help you check symmetry on your model.
Reflection:
The bob is a true test of precision. Reflect on your tension control – did one side end up longer? (Common if your hand tension differs.) Write down which side you find harder to cut (many new stylists find the side opposite their dominant hand challenging). Plan exercises to address this (for instance, practice only on that side, or adjust your stance). Achieving a perfect bob builds discipline that will benefit all future haircuts.
Detailed Step-by-Step Process: Graduated Bob
Preparation
Dampen hair and detangle.
Ask your model/client about preferred length and shape (A-line vs. a more square bob).
Sectioning
Divide into four quadrants or create a horseshoe part from recession to recession for the top.
Secure the top or front sections out of the way.
Create the Nape Guide
Starting at the center of the nape, take a thin horizontal subsection (about 1/2 to 1 inch).
Decide on length (e.g., near hairline).
Slightly tilt the head forward to help create a gentle graduation.
Elevate a small degree (5–10°) and cut your guide.
Build Graduation Upward
Take subsequent horizontal sections, each about 1/2 inch.
Use some of the previously cut hair as a guide.
Maintain consistent slight elevation.
Sides & Over-Direction
Once you reach below the occipital, consider over-directing side sections back if you want an A-line shape (longer front).
Check that the transition from back to sides is smooth.
Top Sections
Let down the top hair.
If it’s a standard bob, continue the same approach with slight elevation.
Comb sections down at natural fall to ensure the perimeter meets your guide.
Cross-Check
Blow-dry or at least towel-dry the perimeter.
Check the shape from side angles and the back.
Adjust any uneven spots.
Detail & Refine
Point-cut or softly chip into the ends if you want a more lived-in look.
Use your mirror to ensure symmetry on both sides.
Style & Review
Finish with a smooth blow-dry.
Confirm the graduation at the nape is even and the front angles match.
Week 7: Short Haircut – Pixie or Crop Cut
Focus: Gain experience with short women’s cuts (pixies and cropped styles). Short cuts involve different tools (texturizing shears, razor) and techniques (scissor-over-comb) that introduce elements of barbering but applied to feminine styles. Note: We focus on short women’s cuts; male barbering fades are not covered in this program.
Learning Resources:
Watch “Amazing Pixie Haircut Tutorial: How To Cut And Style Short Hair” (YouTube). This tutorial shows a salon-friendly pixie cut with soft curtain bangs, combining scissor work on top and clipper-over-comb or scissor-over-comb at the sides for tapering. Notice how the stylist sections the top away and tackles the sides/back first in a pixie.
Self-Learning:
Review Tool Use – when cutting very short hair, sometimes clippers are used for efficiency, but you can achieve similar results with scissors-over-comb. If you have a pair of blending/texturizing shears, familiarize yourself with them (they remove bulk without harsh lines). Re-read any handbook notes on short hair or men’s cutting basics for general tips, but remember we focus on adapting those to women’s pixies.
Hands-On Practice:
On a mannequin (swap to a short-hair mannequin if available), create a pixie cut. Section off the top (from recession to recession in front, and across the crown). Start with the back and sides: use scissor-over-comb to taper the nape area, working from shorter at the hairline to slightly longer up toward the occipital. Next, cut the top section: decide on the style (e.g. lo (Should I be a booth renter or a commission stylist? - Ugly Duckling)wept fringe versus shorter textured top). Use your fingers to lift sections from the top and cut to the desired length, using previously cut sections as a guid (Booth Rent vs Commission: Which Structure Is Better for You?) (Commission vs Booth Rental :: The Pros and Cons of Each)t, refine the shape – use point cutting on the top for texture, and thinning shears around the crown or heavy areas to blend.
On-Site Model Day (Tue):
Find a model (female (Should I be a booth renter or a commission stylist? - Ugly Duckling) (Should I be a booth renter or a commission stylist? - Ugly Duckling)o already has a pixie that needs maintenance. Under mentor guidance, cut or trim the pixie. Pay attention to tailoring the cut to head shape and hair texture – for example, if the model’s hairline grows upward (swirl or cowlick), you’ll need to adjust length in that area accordingly. Practice communicating what you’re doing to the model (short cuts can make clients nervous!). Emphasize styling tips to them as well.
Reflection:
Short cuts will highlight any technical weaknesses because there’s little length to hide behind. Did you leave any weight lines or uneven patches? Reflect on feedback from your mentor about blending and overall silhouette. Note which tools you felt comfortable or awkward with (maybe you loved using the razor or found it tricky). Plan to request more short-hair model opportunities if you feel you need more practice here – these skills will increase your versatility.
Detailed Step-by-Step Process: Basic Pixie Cut
Section Top & Sides
Separate the top (fringe to crown) from the sides/back.
Clip the top out of the way.
Scissor-Over-Comb on Back & Sides
Start at the nape, hold the comb at a slight angle outward.
Slide the comb upward, removing excess length with the scissors.
Gradually move upward toward the occipital, adjusting the comb angle for a smooth taper.
Refine Perimeter
Trim around the ear if needed, keeping the line neat.
Check sideburn area for softness or defined shape, per client preference.
Top Section
Release the top. Decide if you want volume, a fringe, or a textured finish.
Take horizontal or vertical partings, elevate hair to your chosen layering angle.
Use a previously cut portion as a guide.
Connect Top to Sides
Blend the top into the sides/back, either by scissor-over-comb or point cutting.
Watch for weight lines that can form where short meets longer hair.
Texture & Detailing
If the top is too heavy, use point cutting or thinning shears.
Pay attention to any cowlicks (crown or front hairline) and adapt length so it lays well.
Cross-Check
Check from different angles in the mirror for lumps or uneven areas.
Use your fingers to lift sections to confirm a smooth blend.
Style
Depending on the pixie style, add a volumizing mousse or texture cream.
Blow-dry or air-dry; refine with a small round brush or your fingers.
Client Education
Show the client how to style it at home (e.g., a small amount of paste for definition).
Suggest rebooking every 4-6 weeks to maintain the shape.
NOTE on Incorporating Textured Hair Needs:
During Weeks 4–7 (and throughout the program), also include practice on curly, coily, or highly textured mannequins or volunteer models. Focus on specialized techniques for curl-by-curl cutting, stretch-factor considerations, and products suitable for natural or chemically textured hair.
Observe how tension and elevation differ when working with curls. Seek feedback from mentors experienced with diverse hair textures to ensure you gain confidence and competence serving all clients.
Dedicated Mini-Module: Advanced Textured Hair Focus (Integrated Suggestion) To deepen your skills beyond the ongoing practice above, we recommend an additional mini-module at this stage:
Hands-On Curly/Coily Cutting Methods: Explore techniques like Deva-inspired cutting (on dry curls), twist-cutting, or the “pie-section” approach for shaping volume in tightly coiled hair.
Coloring Textured Hair: Understand how porosity can differ in curly hair, affecting color uptake. Practice formulating for high-porosity ends versus lower-porosity roots.
Product & Styling Focus: Experiment with hydrating products, leave-in conditioners, and diffusing vs. hood drying.
Model Day: Aim to do a curly-specific or coily-specific transformation (cut or color) on a volunteer with natural texture.
Incorporate advanced curly systems (e.g., Rezo cut methods if you have the resources) to further expand on the Deva approach.
(Additional Expansion) In light of growing industry demand for inclusive services, we encourage formalizing this mini-module as a dedicated set of extended sessions. For instance, allocate multiple days solely for curly/coily hair theory and practice, bring in guest educators proficient in textured hair, or schedule repeated “textured hair weeks” at intervals. This ensures advanced proficiency rather than just an overview.
By setting aside dedicated time for advanced textured hair education, you’ll strengthen your ability to serve a diverse clientele confidently.
Week 8: Advanced Textured-Hair Education
Focus
Deepen understanding of cutting, coloring, styling, and caring for highly textured, curly, and coily hair.
Practice specialized techniques (dry cutting methods like Deva-inspired, curly layering, coil definition, color formulation for textured hair).
Emphasize product knowledge (hydrating vs. protein-based products), tension adjustments, and scalp care.
Learning Resources Video Tutorials: How To Dry Cut Curls
How To Highlight Curly Hair
Text/Manual
Lux Lox Salon’s internal guide or brand-supplied materials on “Curly Hair Fundamentals” (if available).
If your salon retails a curly-hair product line (e.g., Mizani, Ouidad, or similar), study that brand’s official training PDFs for recommended cutting/styling protocols.
Recommended Articles
BehindtheChair.com or ModernSalon.com articles on advanced curly/coily hair cutting, color placement on curls, and recommended product layering.
Self-Learning
Understand Curl Types: Review the curl classification system (2A–2C, 3A–3C, 4A–4C). Note how each type differs in shrinkage, porosity, and styling needs.
Study Tension & Elevation Adjustments: Recognize that tight curls stretch when wet, so too much tension can lead to unintended shortness after drying.
Product Knowledge: Compare hydrating masks vs. protein-based treatments. Write a list of your top 3 go-to products for each major curl type and why (e.g., heavier cream for type 4, lighter leave-in for type 2).
Read About Color Formulation: Curly/coily hair often has uneven porosity (especially at mid-lengths and ends). Note how to adjust developer strength or timing to achieve even lift or color deposit.
Hands-On Practice
Cutting on a Curly Mannequin
Option A: Dry cut the curls individually (curl-by-curl) to shape and remove bulk where needed—similar to a DevaCut concept.
Option B: Lightly dampen hair, but minimize stretching. Practice cutting with minimal tension so the curls will spring back naturally.
Check shape from multiple angles, especially the perimeter, to ensure the final silhouette is balanced.
Textured-Hair Blow-Dry & Diffuse
On a second mannequin (or the same, after cutting), practice using a diffuser with low speed/low heat.
Focus on not disturbing the curl pattern, gently lifting at the roots for volume.
Compare this to a direct blow-dry with a concentrator nozzle—see how that changes definition vs. frizz.
Color Application on Curly/Coily Hair
If time permits, do a partial highlight or gloss on curly hair. Apply color in a way that respects the curl pattern (e.g., painting surface highlights on each curl or using foil for specific sections).
Check how you saturate the curls—uneven application can lead to patchiness or dryness.
On-Site Model Day (Tue)
Live Curly/Coily Model: Perform either a cut or a color service (or both) on a real textured-hair model.
Consultation Emphasis: Discuss concerns like shrinkage, dryness, frizz, or uneven texture. Confirm the client’s goals (maintain length vs. big chop).
Execution: Use minimal tension when cutting. For color, watch out for overlap on drier ends. Ensure you apply products for maximum moisture.
Mentor Feedback: Have your mentor observe your technique. They should note how you handle sectioning, tension, and shaping to preserve curl integrity.
Reflection
Shape & Shrinkage: Did your final shape match the client’s or mannequin’s initial request, or did extra shrinkage surprise you? What can you adjust next time?
Product Impact: Which styling or coloring products worked best? Note if certain areas got frizzy or needed more moisture.
Customer Communication: Curly-haired clients often ask about at-home maintenance. Did you feel prepared to suggest the right routines (e.g., satin bonnet, co-washing frequency, best leave-ins)?
Planning Next Steps: Jot down any advanced texture certifications you want to explore (Rezo, Ouidad, or local curl specialty classes).
Detailed Step-by-Step Process: Curly/Coily Haircut (Dry Method)
Preparation
Shampoo/condition as needed. Blot-dry gently with a microfiber towel.
Apply a light leave-in or curl cream to define each curl—avoid heavy manipulation.
Section & Assess
Let curls fall naturally; part the hair where the client typically wears it.
Visually identify areas that need shaping (excess bulk at the crown, uneven perimeter, etc.).
Cut Curl-by-Curl
Starting at the nape, pick up one curl at a time. Identify the “curl grouping” or natural cluster.
Trim the ends at the natural angle of the curl pattern, removing split ends or dryness.
Move upward, scanning for uneven lengths or heavy sections.
Check Balance
Step back frequently to see the overall shape. Dry cutting reveals immediate shape (no guesswork about shrinkage).
If a curl is longer or heavier, snip carefully at its end or mid-shaft for internal layering.
Fine-Tune
After the main shape is established, define the face frame or fringe area.
If you find a bulky region, carefully point cut or use thinning shears very sparingly—texturizing can create frizz if done aggressively.
Style & Finish
Lightly mist with a curl refresher or use a diffuser for final drying.
Scrunch gently, then finalize with a serum or lightweight oil if needed.
Home Care Discussion
Suggest suitable shampoo frequency, deep conditioning schedule, and styling product layering.
Demonstrate how to “pineapple” or preserve curls overnight if relevant.
| Rubric: Textured/Curly Hair Skills | Level 1 (Needs Work) | Level 2 (Developing) | Level 3 (Proficient) | Level 4 (Advanced) |
|---|---|---|---|---|
| Consultation & Curl Analysis | Does not assess curl type/porosity, minimal discussion of goals | Partial assessment; identifies some concerns but misses key details | Thorough curl type/porosity check, addresses client concerns, sets realistic goals | Comprehensive analysis of curl pattern, density, & porosity; fully educates client on realistic outcomes |
| Cutting Technique | Uses high tension or typical straight-hair methods, leading to uneven shrinkage | Adjusts tension somewhat, still some mismatch after drying | Minimizes tension, shapes curls effectively, final shape mostly consistent | Expertly shapes each curl or curl grouping, final shape consistent & balanced in all areas |
| Moisture & Product Application | Neglects moisture needs, no appropriate product usage | Applies some product but not enough for full definition/health | Chooses suitable products for dryness or frizz, good product distribution | Tailors product layering specifically to each section, achieving maximum curl health & definition |
| Styling & Finishing | Over-manipulates curls causing frizz, lacks diffuser control | Improves definition but some frizz or dryness remains | Uses diffuser properly, minimal frizz, curls appear defined & bouncy | Professional-level finishing—curls have uniform definition, volume, shine, zero frizz |
| Client Education | Does not discuss aftercare, nighttime routine, or product recommendations | Briefly mentions maintenance but not in detail | Explains daily care, recommended wash frequency, styling tips | Thorough home-care coaching with demos (e.g., pineapple method, satin bonnets), plus customized product regimen |
Short Quiz: Textured-Hair Basics
True or False: Curly/coily hair typically needs less moisture than straight hair.
Multiple Choice: Which scenario best describes “shrinkage”?
- A. Hair gets physically shorter due to humidity
- B. Curls contract more tightly after drying, revealing shorter length
- C. The hair cuticle closes after a deep conditioner
- D. Hair tangles up when cut too short
Short Answer: Why might you avoid applying the same tension on curly/coily hair that you would use for straight hair during cutting?
Week 9: Texturizing & Thinning Techniques
Focus: Learn how to remove bulk and add texture to haircuts using specialized techniques. You’ll practice using thinning shears, point cutting, and razor texture to refine shapes without altering the overall length.
Learning Resources:
Watch Sam Villa’s “Texturizing Cutting Techniques… The What, How & Why” (YouTube). This demonstration covers when to use blunt shears vs. blending shears vs. razors for texturizing, and shows examples on different hair types. Observe the difference between removing weight at the ends (for softness) versus within the mid-strands (for reducing bulk).
Self-Learning:
Study your scissors kit: identify your texturizing shear (often 30-40 tooth thinning shears). Practice the motion of scissor-over-comb on a mannequin to remove bulk at the sides. Review handbook notes if available on “interior cutting” or “thinning.” Key point: texturizing should be deliberate – too much can make hair frizzy or sparse, so learn to do just enough.
Hands-On Practice:
Take a mannequin (perhaps reuse one of your earlier haircuts that feels heavy). Identify heavy areas (thick sections that don’t lie flat or styles that feel bulky). Practice three methods:
Point Cutting – take a section and snip with the points of your shears into the ends at a 45° angle, removing little “points” of hair.
Thinning Shears – take small horizontal sections in a thick area (like midshaft of a blunt cut) and close the thinning shears midway down the strand once or twice, then comb out the cut hair.
Razor Slide Cutting – with a razor (or razor comb), gently slide from mid-length to ends on a section to create soft layers.
Compare the effects.
On-Site Model Day (Tue):
During (How To Photograph Hair For Instagram: 7 Pro Tips) (These Are The Best Tips And Tricks For Hairstylists Instagram Pictures) (maybe a repeat model from a previous cut), focus on refining the cut with texturizing. For example, if your model from Week 6’s bob has very thick hair, use thinning shears underneath to make it lay better, or if your Week 5 long-layer model’s ends seem chunky, use point cutting to soften. Do this under mentor supervision – they will guide where and how much to texturize (e.g. “remove bulk behind the ears” or “soften the fringe ends”).
Reflection:
Note the before-and-after difference in manageability after texturizing. How did the hair behave? Write down any caution your mentor gave (common one: “Don’t go too close to the root with thinning shears” to avoid fuzzy grow-out). Also reflect on which technique you prefer or see yourself using most. Effective texturizing is a mark of an advanced stylist, preventing that “shelf-y” look and customizing each cut to the client’s hair density.
Detailed Step-by-Step Process: Basic Texturizing Methods
Point Cutting
Hold a section of hair at 90° from the head or horizontally at the desired elevation.
Use the tips of your shears to cut small notches into the ends.
Vary angle for more or less softness.
Thinning Shears
Identify where excess bulk exists (often mid-strands in thick hair).
Take a horizontal subsection, place thinning shears about halfway down the length, close them once or twice, then comb out.
Work in small increments to avoid over-thinning.
Razor Slide Cutting
Hold a subsection taut.
Position the razor at mid-length, lightly stroke downward toward the ends.
Keep consistent pressure; too much can cause breakage.
Great for face-framing or layering.
Check in Natural Fall
Comb hair down, let it fall naturally.
See if the texture is balanced or if more removal is needed.
Refine
Use normal shears to remove any stray long bits.
Consider how the hair moves: if it flips oddly, you might have over-texturized an area.
Client Discussion
Explain how texturizing helps them style hair more easily.
Mention recommended styling products for a piecey or smooth finish, depending on the effect created.
Week 10: Cutting Fringes (Bangs) & Face-Framing
Focus: Master the art of cutting fringes (bangs) and face-framing layers around the front. These detail areas can change the entire look of a haircut and must be customized to the client’s face shape and preferences.
Learning Resources:
Watch “How to Cut Face-Framing Layers with Gilad Goldstein” (YouTube, via Beauty Insider). In this video, a pro stylist shows how to section and cut face-framing pieces while preserving length, and how to seamlessly blend a fringe into the sides.
Also watch “How to Cut Soft 90s Face-Framing Bangs” (YouTube, stylist April) for a demonstration of creating that trendy curtain bang look with a soft center part.
Self-Learning:
Review different fringe styles: blunt straight-across bangs, side-swept bangs, curtain bangs, etc. Consider which face shapes each suits (e.g. curtain bangs are versatile; blunt bangs accentuate eyes but not ideal for very small foreheads). In your notes, list the core steps for cutting bangs safely: cut longer than desired initially (you can always trim more), check dry versus wet, and consider the natural fall (growth patterns at the hairline).
Hands-On Practice:
Practice on a mannequin (preferably one with longer hair so you have material for face frame). First, section a triangular subsection for a basic fringe (apex of head to eyebrow arches). Decide on a bang style – e.g. a curtain fringe – and cut accordingly: elevate the section slightly and point cut to create a soft short-to-long (short in center, longer toward temples). Next, create face-framing layers: take diagonal forward sections on each side of the face, over-direct slightly back, and cut from chin length down to meet the ends (this creates a subtle layer that frames the face). Cross-check symmetry on both sides by bringing pieces to the center under the chin to see if they match.
On-Site Model Day (Tue):
Many clients are nervous about bangs – find a model who is considering a change in their front pieces (even something like adding a long side bang). Under supervision, section carefully and talk the model through the plan (“We’ll start longer and adjust gradually”). Cut the fringe or face-frame and immediately style it to ensure it’s laying correctly (often a quick blow dry or flat iron tweak helps see the final look). Have your mentor check the length and balance before finalizing.
Reflection:
Fringes require confidence and care. Reflect on how you felt doing it – did you cut too timidly (resulting in little change) or too aggressively (oops, shorter than intended)? Note that dry hair shows true length – many stylists cut bangs on dry hair for precision. Write in your journal a step-by-step “fringe cutting protocol” for yourself to follow in the future (including consultation points like asking how the client styles their fringe). This will help ensure you approach future bang cuts methodically and successfully.
Detailed Step-by-Step Process: Cutting Curtain Bangs & Face-Framing
Section the Fringe
Create a triangle section with the apex around the high point of the head.
The base lines up roughly with the outer edges of the eyebrows.
Determine Length
Consult the client about how short they want the center vs. the sides.
Start slightly longer to be safe.
Cut the Center
Take a small center subsection.
Elevate and point cut to the desired length (e.g., bridge of nose if planning curtain bangs).
Angle Toward Sides
Over-direct the adjacent sections toward the center guide.
This naturally creates a longer length toward the temples.
Check Symmetry
Compare left and right sides by bringing them together in front of the face.
Refine any unevenness.
Blend into Face-Frame
Take diagonal forward sections on each side.
Connect the fringe length to the mid-length using your desired layering angle.
Dry & Refine
Blow-dry or flat iron the fringe in place.
Snip any stray longer pieces if you see an imbalance.
Finalize
Show the client different ways to part or style the bangs (center vs. off-center).
Confirm they’re happy with the length and shape.
Week 11: Mid-Program Skills Assessment
Focus: This week you will pause new material and perform an assessment of all skills learned so far (Weeks 1–10). The goal is to identify strengths and areas for improvement at the midpoint. You’ll do a mock client service from start to finish: consultation, shampoo, a haircut (stylist’s choice or mentor’s assignment), blow-dry style, and even a brief product recommendation or rebooking conversation to simulate real salon workflow.
Assessment Structure: You will be assigned a model (or client) to perform a full service on, under examination conditions. Your mentor or trainer will observe silently and score you on criteria such as: consultation thoroughness, sectioning and technique in cut, control of tools during styling, final result quality, client handling and comfort, and timing. Treat this like a real appointment – from greeting the client to finishing the service on time.
Preparation:
Review your notes from all previous weeks. Especially revisit anything you struggled with. Prepare a “game plan” for the haircut you’ll do – likely your mentor will tell you the service in advance (e.g. a one-length trim with face-frame and blowout).
Gather all tools you’ll need and double-check they are clean, sanitized, and in good working order (just like state board taught you). Mentally rehearse the consultation and key steps.
On Assessment Day:
Conduct the service as practiced. For example, greet the model and perform a consultation (Week 3 skills). Proceed to shampoo (Week 1 techniques), then execute the haircut (maybe a bob from Week 6 or layers from Week 5, as assigned). Use proper sectioning and check-point as you learned. After the cut, blow-dry and style the hair (Weeks 1–2 skills). Throughout, maintain a professional demeanor – explain what you’re doing when appropriate, ensure the client’s comfort, and adapt if something isn’t working (e.g., if you notice during the cut that one side is longer, correct it). End the service by showing the client the result in the mirror, offering styling tips or product advice, and thanking them.
Evaluation:
Your mentor will fill out an evaluation form and then review it with you. Pay close attention to feedback: perhaps your cutting technique is strong but you need to improve blow-dry speed, or your technical work is good but you could be more assertive in consultation recommendations. This feedback is gold – it will shape your focus for the second half of the program.
Post-Assessment Reflection:
Write a detailed self-reflection on the assessment. Note what you did well (maybe “kept station tidy and organized sections well”) and what you want to improve (“hesitated to use thinning shears on thick hair, need more practice so I trust myself”). Compare your self-evaluation with your mentor’s evaluation – do they align? Set new learning goals for Weeks 12–24 based on this, such as “By Week 18, improve blowout time by 10 minutes” or “Seek 2 extra short-hair models to boost confidence.” This mid-point check keeps you on track to meet all objectives by Week 36.
NOTE on Micro-Evaluations / Quizzes: In addition to this formal Week 11 assessment, your mentor may administer short quizzes or demonstration checks at the end of each skill segment (e.g., a quick color theory test in Week 13, or a scissor-over-comb mini demo in Week 7).
These micro-evaluations help catch small errors early and reinforce understanding of each week’s material before moving on.
Week 12: Precision Cutting – Sassoon ABC Method
Focus: Delve into advanced precision cutting by exploring the Sassoon ABC Cutting Method – a world-renowned system teaching the fundamentals of precision: Line, Graduation, and Layering. This week, you will reinforce the core techniques (one-length line, graduated bob, uniform layers) in a very disciplined way to refine your accuracy and consistency.
Learning Resources:
“One‑Length Haircut: The Theory – ABC Assessment & Blueprint”
James Atkinson – The Life of Hair (former Sassoon Academy educator)
17‑minute lesson that starts with bone‑structure analysis and shows, in real time, how to draw the head‑sheet diagram before a single cut is made. This covers the Assessment and Blueprint stages in detail.
“Graduated Bob Haircut | Vidal Sassoon”
The Life of Hair channel
After a quick head‑shape assessment, James diagrams the classic graduated bob and then executes it step‑by‑step, highlighting finger angle, elevation, and section discipline—the heart of the Cutting stage.
Optional context clips
“The ABC Classic Technical Series explained by Mark Hayes” – 5‑minute overview of the philosophy behind Assessment → Blueprint → Cutting.
“Short Pixie Hair Cut | Vidal Sassoon Round Graduation”
The Life of Hair channel
A full ABC flow on a short shape: assessment, diagramming the Blueprint, and precise execution of round graduation. Excellent for seeing how ABC principles adapt to very short hair.
“ABC | Cutting Hair the Sassoon Way (Promo)” – 2‑minute teaser that visually summarizes all three stages.
Tip: Use the three printed diagrams included in this guide—Assessment, Blueprint, and Cutting. Trace each one on paper, then draw the same lines on your mannequin head before you start cutting. This quick exercise locks in the section map and angles so you feel confident once the scissors are in your hand.
Assessment
Blueprint
Cutting
Self‑Learning: Precision Cutting Mastery
1. Precision‑Cutting Checklist
| Step | What to check | Why it matters |
|---|---|---|
| Prep | Freshly shampooed, towel‑blotted, fully detangled hair | Dry spots or tangles skew cutting lines |
| Sectioning | Clean “hot‑cross‑bun” partings before subdividing | Keeps guides visible & tension even |
| Moisture Control | Re‑mist each new panel | Uneven dampness = uneven shrinkage |
| Comb & Shear Discipline | Palm shears while combing; reset tension | Prevents accidental snips |
| Tension | Same grip pressure on left & right | Inconsistent tension = one side longer |
| Body Position | Eyes level with the cutting line | Correct posture protects accuracy & ergonomics |
| Elevation Guide | 0° Line • 45° Graduation • 90° Layers | Sticking to geometry prevents “drift” |
| Cross‑Check | Line = vertical • Grad = opposite diagonal • Layers = horizontal | Catches imbalance early |
| Dry Refinement | Blow‑dry, then point‑cut only where needed | Perfects the perimeter without losing shape |
2. Blueprint‑Drawing Drills
AClassic Bob Diagram
- Draw head outline, mark vertex, occipital & ears.
- Add the hot‑cross‑bun partings.
- Sketch a horizontal perimeter guideline at bob length.
- Add horizontal partings up the back—graduation zone.
- Draw diagonal‑forward sides, noting over‑direction back.
BLong‑Layer Diagram
- Draw head & core reference lines.
- Add radial “pie‑slice” sections from crown to hairline.
- Mark a traveling guide at 90° elevation around the head.
- Indicate slight over‑direction of front slices for face‑framing length.
3. Mannequin Exercise
- Recreate either diagram on a mannequin using clips or colored tape.
- Cut the shape exactly as drawn, checking each guideline against the paper.
- Blow‑dry, refine, then photograph the mannequin beside your drawing to compare.
Master these clean partings, uniform moisture, and blueprint drills—you’ll feel in control every time you tackle a precision bob, graduation, or layered cut.
Hands‑On Practice:
Choose your focus shape: either a precision Graduated Bob (true 45° graduation) or a pure One‑Length Line (0° elevation).
Assessment – examine the mannequin’s bone structure and decide the exact perimeter length or graduation angle.
Blueprint – draw the section map on paper and clip matching partings on the mannequin (neat hot‑cross‑bun, then horizontal or diagonal panels).
Cutting – work with strict discipline: every panel at the chosen elevation, identical tension on both sides, blades parallel to your partings.
Self‑correction – record a short video (or ask a classmate to watch) and note any drift in posture, finger angle, or section size; adjust immediately.
On‑Site Practice:
You will perform at least one haircut using pure Sassoon technique on a mannequin: for example, a precision graduated bob following Sassoon protocol (this ties together your Week 6 bob with even stricter technique). Focus on each step: Assessment – determine the bone structure and appropriate angle of graduation; Blueprint – section the mannequin precisely and decide your guideline lengths; Cutting – execute with discipline (e.g., every section at exactly 45° for graduation). Alternatively, do a one-length “line” cut again with Sassoon mindset to refine it further. Record yourself or have someone call out if your body positioning or finger angle drifts, since self-correction is key in precision work.
If no full‑session live model is available, give your mentor a 10‑minute mannequin demonstration during downtime:
Show your clipped Blueprint.
Execute two complete panels while they watch for clean partings, consistent moisture, and steady tension.
Apply their feedback the same day on any client who needs a precise blunt trim or bob refinement.
Reflection:
Precision cutting is often described as “haircutting scales” (like musical scales) – tedious but builds excellent skill. Reflect on the experience: did you find it meditative or frustrating? What did you notice about your habits – perhaps you learned your comb partings could be cleaner or that you need to work on keeping even tension with your non-dominant hand. Note any improvements in your work’s symmetry or flow as a result of this meticulous practice. Going forward, aim to incorporate the precision and planning of Sassoon method into all your cuts (even faster-paced ones) for superior results. Your enhanced discipline now will set you apart as you move into advanced color and styling.
Precision work is “hair‑cutting scales.” After each session, jot quick notes:
Was the process calming or frustrating?
Did one side end up longer? (Trace it to tension or body angle.)
How clean were your partings compared with the Blueprint diagram?
What single habit will you tighten next time—re‑misting more often, eye‑level stance, or palming shears while combing?
Goal: carry this disciplined Sassoon mindset into faster salon‑speed cuts without sacrificing accuracy.
Week 13: Hair Color Theory & Oligo Product Knowledge
Focus: Build a rock‑solid grasp of fundamental color theory and the Oligo Professional system used at Lux Lox. By week’s end you should be able to:
Explain levels, tones, and underlying pigment.
Read Oligo level/tone codes and developer options.
Formulate a single‑process color—including gray coverage—on paper and on a live model.
Learning Resources: Watch “Hair Color Theory 101” by Kenra Professional on YouTube—this class walks through the color wheel, complementary neutralization, and the 1‑to‑10 level system with clear visual demos.
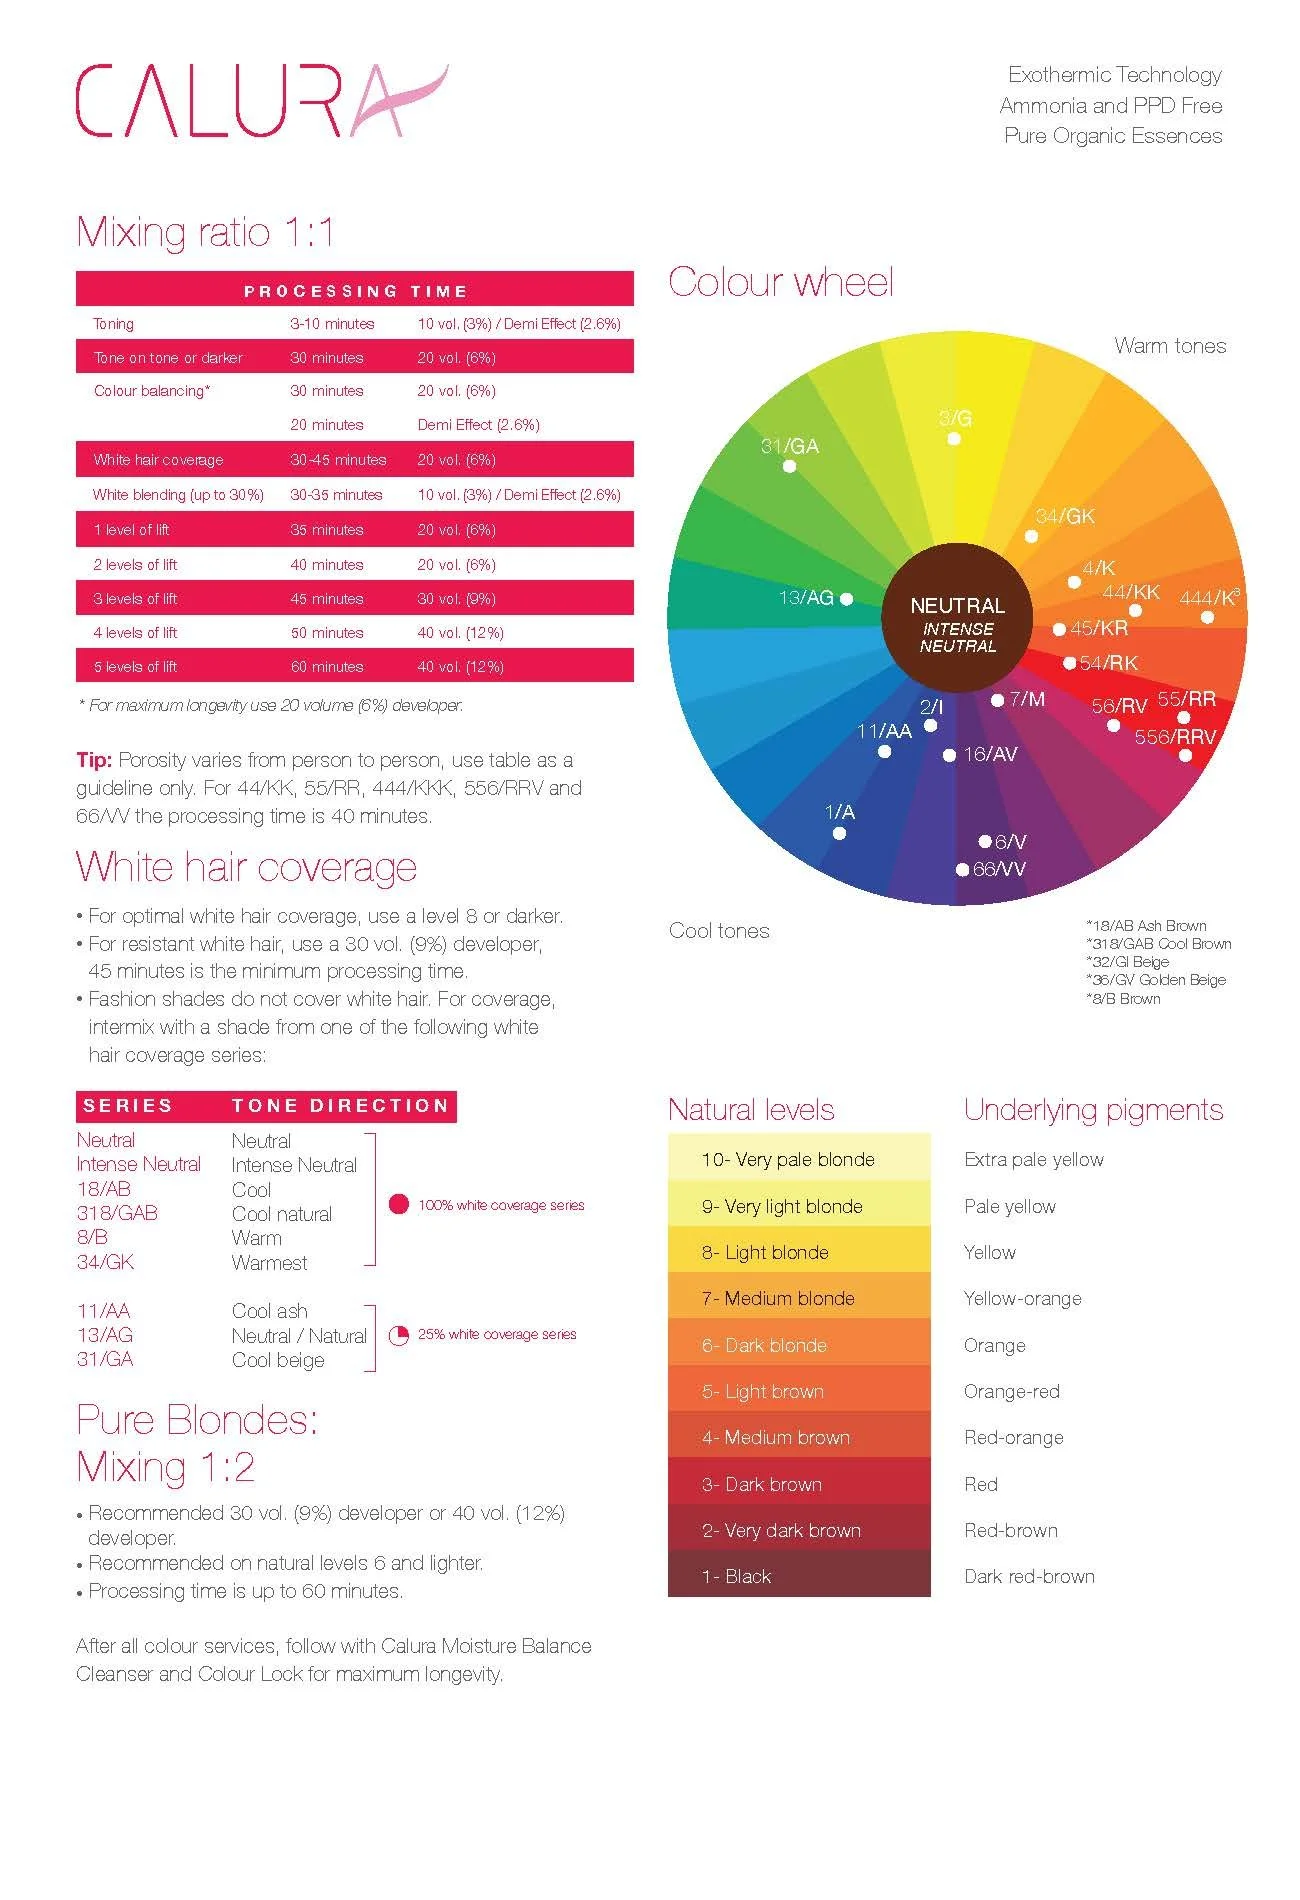
Next, watch “Oligo Calura Hair Color Masterclass: Expert Tips & Troubleshooting” on YouTube (Ultimate Hair Color Mastery – Oligo Calura & Blacklight). This masterclass breaks down every Calura shade series, recommended developer pairings, mixing ratios (1:1 for Permanent, 1:2 for Gloss), and common formulating fixes.
“Best of Oligo” – Michelle (YouTube)
Calura Lineup & Ratios – Permanent Shine (1:1, up to 5 levels lift), Gloss (1:2, pure tone & shine), 10‑Minute Color (1:1, 100% gray coverage in 10 min).
Exothermic Technology – How Oligo’s gentle heat‑activated lift yields even pigment penetration and enhanced hair health.
Shade Coding – Reading level/tone codes (e.g. 6.34 gold‑copper, P12 pearl), plus fashion modifiers (A = Ash, I = Iridescent).
Neutralizers vs Intensifiers – When to use Blue, Green, Violet neutralizers or boost with Gold, Copper, Reds (up to 25% of formula).
Application Tips – Section patterns for roots vs lengths, ideal developer volumes (20 vol for deposit & gray, 30–40 vol for lift), and precise timing.
Post‑Color Protocol – Using Oligo’s Color Lock shampoo, bond‑building “Blacklight” treatments, and scalp‑safe stain removers.
tECHNICAL mANUAL
After viewing, study Oligo’s official 2025 Technical Manual, level/tone swatch book, and developer chart in the color bar—pay special attention to the 1‑10 level scale and tone codes (.0 Neutral, .1 Ash, .3 Gold, .4 Copper, etc.), the built‑in CaluraPLEX bond shield, and developer guidelines (10 vol = deposit, 20 vol = 1‑2 levels lift, 30 vol = 2‑3 levels, 40 vol = up to 4 levels).
DIGITAL CHART
Self-Learning: Revisit fundamental color theory: the color wheel, primary/secondary colors, what neutralizes what (e.g., blue cancels orange) (Hands-On Experience: The Importance of Practical Training in Cosmetology). In your notes, list the underlying pigment at each level (e.g., level 6 has orange underlying, level 9 yellow, etc.) as this is crucial for formulating. Write down key definitions: permanent vs demi-permanent, developer volumes and their effects (10-vol = deposit only, 20-vol = 1-2 levels lift, etc.). Then focus on Oligo specifics: what is the mixing ratio for Calura permanent color? How long is processing time? Does Oligo have a special technology (for example, some lines have built-in bond protectors, etc.) – note anything of that sort from the masterclass video or Oligo literature.
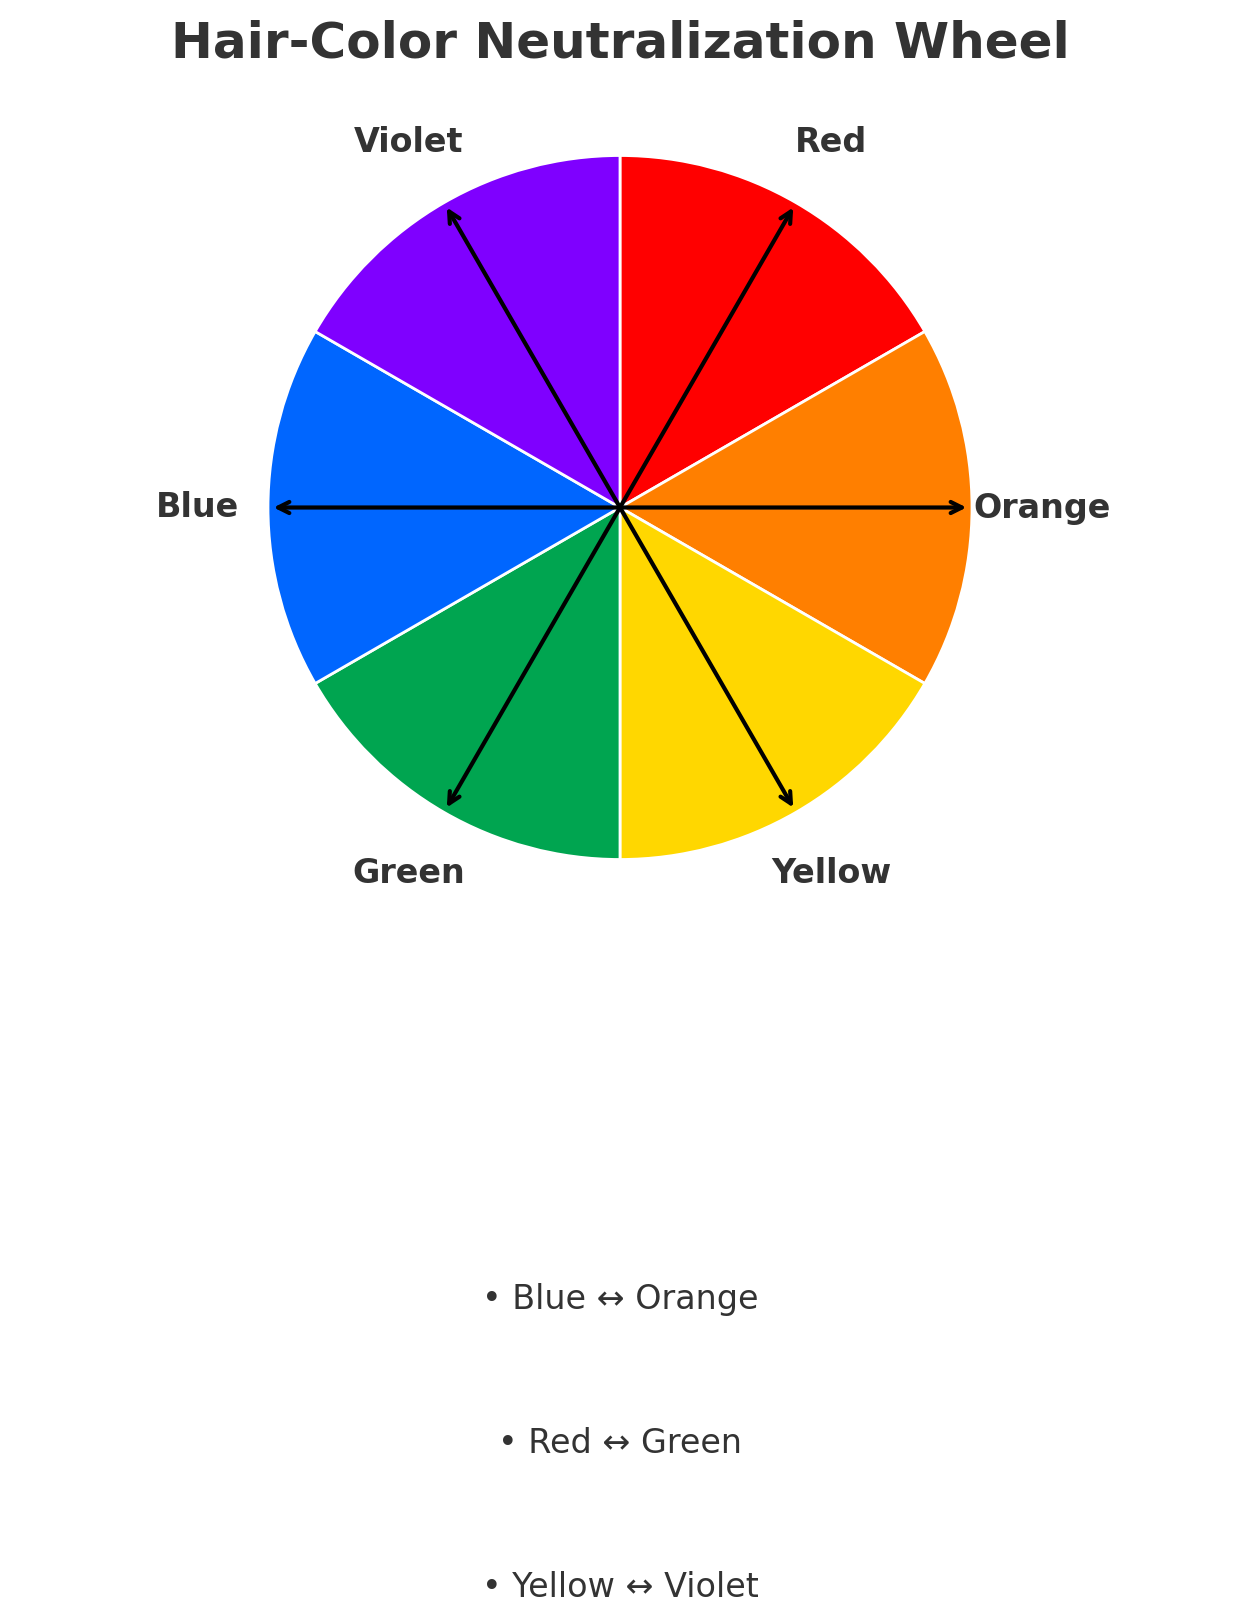
Review the color wheel—complementary pairs (Blue ⇔ Orange, Red ⇔ Green, Yellow ⇔ Violet).
Underlying pigment cheat sheet (memorize)
Basic Color Wheel & Neutralization Guide
Opposite colors (complements) cancel or neutralize each other in hair‑color formulation. Refer to this wheel whenever you need to control unwanted warmth.
| Natural Level |
Exposed Underlying Pigment (when lightened) |
|---|---|
| 1 – 2 | Dark red‑brown |
| 3 | Red‑brown |
| 4 | Red |
| 5 | Red‑orange |
| 6 | Orange |
| 7 | Orange‑yellow |
| 8 | Yellow |
| 9 | Pale yellow |
| 10 | Palest yellow |
Hands-On Practice: Before working on a model, do some formulation exercises on paper. For instance: formulate for “50% gray hair, natural level 6, wants to be level 6 neutral brown using Oligo.” Determine the formula (perhaps 6N + 20 vol). Do a few scenarios, including one for a darker tint-back (like going from blonde to brown – what fillers might you need) and one for going lighter (like level 4 to level 6 copper – how to account for underlying pigment). Discuss your answers with your mentor to see if they’d adjust anything. If swatch samples are available, you could also practice mixing a small batch of color in a bowl to get comfortable with consistency – mix a level 8 shade with developer and observe the texture and timing as it oxidizes (maybe on a weft of hair or just to throw away).
Onsite Model Day (Tuesday): Perform a basic single-process color on a model, using Oligo products. A great exercise is a root touch-up or all-over color on someone who wants to cover gray or go richer in tone. For example, a model with dull brown hair wants to be a vibrant auburn brown. Consultation: determine target shade, explain upkeep. Formulate with your mentor’s guidance: perhaps choose an Oligo Calura permanent shade at the target level with the right tone (e.g., 6.34 for a gold-copper brown) and appropriate developer. Perform the application as taught: typically segment hair into quadrants and apply color to regrowth or through ends accordingly. Focus on even saturation – no dry spots. Pay attention to timing (start a timer as per Oligo’s instructions, usually 30-45 min). While processing, periodically check how the color is oxidizing and talk through the expected outcome. After processing, emulsify, rinse, and follow with recommended post-color treatment (maybe Oligo has a specific shampoo or sealer). Blow-dry the model and evaluate the result under good lighting. This experience is about getting comfortable with the motions of coloring and trusting your formulation. It’s your first real color application in the program, so celebrate it!
Optional Practice Day: You can do a color application on a mannequin (e.g., apply a fantasy color or just practice root touch-up application speed). Alternatively, use this time to further swatch test Oligo colors – some assistants create a swatch library by painting formula mixes on white hair swatches to see results. Or simply dive deeper into Oligo’s product line: read about their Blacklight lighteners, Gloss demis, etc., which you will be using in upcoming weeks. Being intellectually prepared will pay off during hands-on color work.
Reflection: Write down your model’s formula and result in a tracking log – e.g., “Model Jane: natural 50% gray level 5, formula 5NN + 20vol, result – full coverage, looked natural.” Keeping a formula log is a great professional habit. Reflect on the process: Did your color turn out as expected? If not, analyze why – was the target achieved or was there an unexpected tone? Discuss with your mentor; maybe the hair pulled warm or cool. Also note how you managed the clean-up and stain removal (did you protect the skin well, etc.). Now that you’ve done one, do you feel ready to tackle more? Identify anything you want to clarify (like “I want to practice mixing glosses” or “need to review gray coverage tricks”). You’ve officially embarked on the coloring path – with theory in mind and Oligo by your side, you’re set for more creative work ahead.
Client Allergy & Patch Testing:
Note that if a client reports sensitive scalp or any history of allergic reactions, a patch test is recommended 48 hours before the service.
Apply a small amount of chosen color formula behind the ear or in the inner elbow area, let it process, and observe for irritation.
While busy salons may not always do this, you should be aware of the procedure and discuss it with clients who have concerns.
Detailed Step-by-Step Process: Basic Hair Color Formulation
Identify Natural Level & Target Level
Ask if there’s existing dye on the hair.
Compare hair to a level swatch chart.
Determine Underlying Pigment
Based on the target level, identify the warm or cool undertone you’ll likely see when lightening.
Decide on Tone
Does the client want to enhance warm tones (golden/copper) or neutralize them (ash/pearl)?
Choose Product & Developer
For permanent or gray coverage, choose Oligo Calura Permanent with the recommended developer volume.
For demi or gloss, pick the Oligo Gloss line.
Mix Ratio
Follow Oligo’s recommended mixing ratio (e.g. 1:1 or 1:2).
Add any bond builder if needed (e.g. Olaplex Step 1).
Strand Test (Optional)
For uncertain outcomes, take a small strand test to confirm color result.
Apply & Process
Follow application technique (roots first, etc.).
Process for the recommended time.
Rinse & Evaluate
Check the final result, possibly tone or adjust as needed.
Record Formula: Log your exact formula, brand, developer, and timing in the client’s record.
Week 14: Gray Coverage and Root Touch-Up Mastery
Focus: Learn techniques for achieving 100% gray coverage and seamless root touch-ups. Gray coverage is a bread-and-butter salon service – you must know how to formulate for resistant gray and avoid banding on regrowth applications.
Learning Resources:
Watch “Coloring Gray Hair 101” by Kenra Professional (with educator Oliver Shortall). This video explains the challenges of gray hair (lack of pigment, sometimes resistant cuticle) and tips like adding neutral/base tones and sufficient processing time for coverage. It also showcases using Kenra’s gray coverage series – compare this info to Oligo’s gray coverage shades. Additionally, read the Oligo manual’s section on Calura Gray Coverage if available. Oligo might have a line of NN or highly pigmented series; know those tools.
Self-Learning:
Note key formulation principles for gray: use neutral or natural base for at least 50% of your formula on high-percentage gray clients (pigment balance), possibly bump up developer strength for very resistant hairlines, and process fully (never rinse early). In your notes, outline the steps of a root touch-up service from start to finish, including sectioning for application (typically 4-quadrant sectioning, apply color to regrowth only). Also review how to avoid overlap onto previously colored hair to prevent banding – usually by applying carefully and stopping where the line of demarcation is.
Hands-On Practice:
Practice a mock root touch-up on a mannequin or swatch. Mix a mock color (you can use conditioner colored with food coloring for simulation). Section the mannequin into quadrants. Practice applying “color” with a bowl and brush along the regrowth only – see if you can do it neatly without spreading onto mid-lengths. Time yourself to see how long it takes to do a full head (goal is about 15 minutes application time for roots, in real life). If possible, prepare actual color swatches: take one dark human hair weft, apply a gray coverage formula to a section to see coverage, though this may be limited without real gray hair. Alternatively, enlist a friend or relative with some gray for a real root touch-up (with mentor permission), to get realistic practice.
On-Site Model Day (Tue):
Work on a live root touch-up under supervision. Ideally, a salon client or model with visible regrowth (perhaps a staff member volunteering). You will consult to identify their natural level and percentage of gray, formulate with mentor approval, and perform the application. Focus on saturating the gray areas well. Use the edge of your tint brush to get those stubborn temple hairs. Mind the timing – start your timer after application to ensure a full processing time as recommended (often 35-45 minutes for gray coverage). After processing, you or your mentor will rinse and blow-dry so you can see the result.
Reflection:
Evaluate the coverage – did the grays take on the desired color fully, or do they appear translucent? If less than perfect, discuss with your mentor what could be adjusted (common tweaks: add more neutral base, increase developer volume or processing time, pre-soften the gray by applying developer alone for 5 minutes, etc.). Document these tips. Also reflect on your application technique: Any messiness (e.g. stained the scal (Lux Lox Salon – 52-Week Advanced Training Guide.pdf)ow was your speed vs thoroughne (Lux Lox Salon – 52-Week Advanced Training Guide.pdf)ray coverage is a service where consistency ()ur notes here will help ensure every root touch-up you do is reliable and satisfies the client’s expectation of “no more grays showing.”
Additional Speed & Efficiency Benchmark: By Week 14, aim to apply root color (retouch) in about 15 minutes or less for a standard regrowth area—while maintaining cleanliness and precision.
Detailed Step-by-Step Process: Standard Gray Coverage Root Touch-Up
Section Hair
Part into four quadrants.
Clip each quadrant securely.
Formulate
Choose a formula with at least 50% neutral or natural base (for high-percentage gray).
Select appropriate developer (often 20vol, or 30vol for resistant hair).
Apply to Quadrants
Start at the area most resistant (often the front hairline).
Take 1/4-inch partings, apply color to the regrowth only.
Avoid overlapping onto previously colored hair.
Temple & Hairline
Pay extra attention to saturate fine or resistant gray hairs at the temple.
Double-check you’ve covered all visible roots.
Time & Monitor
Begin timing once you finish application.
Process the full recommended time (often 35–45 minutes).
Rinse & Shampoo
Gently emulsify with water, then rinse thoroughly.
Shampoo and condition if brand guidelines advise.
Check Coverage
Towel-dry or blow-dry to see if stubborn grays are fully covered.
If not, discuss next-step solutions (like pre-softening next time).
Style & Finish
Proceed with the requested styling.
Evaluate final color in good lighting.
Record Formula
Log formula, developer, processing time, and results for future reference.
Week 15: Highlights 101 – Foil Highlight Fundamentals
Focus: Learn classic foil highlighting techniques for creating dimension through the hair. This week covers sectioning patterns (full head, partial), how to weave or slice hair for highlights, proper foil placement and folding, and ensuring even lift.
Learning Resources:Learning Resources: Watch “How to Foil Hair – 4 Foil Placement Techniques | Kenra Color” on YouTube (How to Foil Hair Tutorial | Kenra Color - YouTube). This tutorial demonstrates classic foil patterns (like front hairline highlight, horizontal vs diagonal sections, etc.) and is great for visualizing how to weave and place foils evenly.
Also watch Oligo’s educator (Heather, for example) if available in “Ultimate Hair Color Mastery – Oligo Calura & Blacklight” (Ultimate Hair Color Mastery - Oligo Calura & Blacklight - YouTube) to see Blacklight lightener in action and any specific mixing tips. Additionally, read Oligo’s instructions for Blacklight Lightening System: recommended mix (probably 1:2 ratio with developer), maximum lift, and whether heat is allowed.
Self-Learning:
Review the color theory now in context of highlights: when you lighten hair, underlying warmth is exposed. So consider the need for toners after highlights (to be covered next week). Learn the terminology: weaving (picking up fine strands for a more natural blended highlight) vs slicing (taking a section slice for a bolder streak). Write down the standard sectioning for a full head highlight: usually starting at the nape with horizontal foils, working up, doing side sections diagonally, and a mohawk section on top. Think about foil handling – practicing how to fold foils securely is important to prevent bleed marks.
Hands-On Practice:
Using a mannequin with medium brown or dark blonde hair, do a partial highlight: e.g., crown and front area. Section the hair as if doing a half-head: part down the middle, then part from ear to ear across the crown (everything above that line is your section to highlight). Take 1/4-inch subsections, weave a fine highlight, place a foil under the weave, apply lightener (could use conditioner mixed with baking soda as pretend lightener), and fold foil. Continue foiling every 2–3 subsections (depending on desired spacing – maybe do back-to-back foils for higher density in front, and skip some for lower density in back). Focus on consistency: same amount of hair in each foil, saturate all the way through the ends (important for even lift). Practice the trickier areas like around the hairline – use smaller weaves for a natural look.
On-Site Model Day (Tue):
Perform highlights on a model. Start with something manageable – for example, a face-frame highlight or a few foils on the top (a “money piece” perhaps). Under mentor guidance, section and foil on a live person. Pay attention to maintaining tension on the foil (have the model hold a foil if needed or use a clip at the top to secure). Rinse out and tone if needed with mentor’s help (toning will be covered soon, but you can start observing the process). Seeing the actual lift result teaches you how well your application was (spots that didn’t lift evenly might indicate inadequate saturation or slipped foils).
Reflection:
Highlighting is as much an art as a science. Reflect on the uniformity of your weaves – did they look consistent, or were some chunky and some fine? Ask your mentor to critique your foil placement: any slippage or bleed? Write down foil placement patterns you did and the effect (e.g., “diagonal foils around face = softer blend”). Also note how long the process took vs how long it’s typically booked for; efficiency will improve with practice. Mastering foils sets you up to tackle advanced techniques like balayage and combined color later on, so solidify these fundamentals.
Detailed Step-by-Step Process: Basic Foil Highlight
Mix Lightener
Follow manufacturer’s instructions (e.g. 1:2 ratio with 20vol developer).
Ensure consistency is not too runny or it may bleed.
Sectioning
Divide hair into 4–6 sections (depending on whether it’s a full or partial highlight).
Clip each section neatly.
Weaving or Slicing
Starting at the nape, take a thin subsection (about 1/4 inch).
Weave out a small portion if you want subtle highlights, or take a slice for bolder highlights.
Placing Foil
Slide a foil underneath the woven subsection, close to the scalp.
Paint lightener from mid-length to ends first, then near the roots last to avoid overlap on the scalp.
Fold the foil in half or in thirds, ensuring the edges are sealed.
Spacing
Decide how many foils you want based on the desired look (dense or spread out).
Move upward row by row.
Hairline & Top
Use finer weaves around the face for a natural finish.
At the top/crown, consider the client’s parting.
Process & Check
Watch the foils you applied first – they may lift faster.
Open a foil gently to check color progress periodically.
Rinse
Once the target lift is reached, rinse thoroughly.
Remove foils carefully to prevent color from bleeding.
Tone
If needed, apply a toner to neutralize or refine the highlight tone.
Rinse, shampoo, and condition as directed.
Style & Reveal
Blow-dry and style so you can see the final result.
Show the client how the new highlights brighten their overall look.
Week 16: Advanced Foiling – Full Head & Placement Strategies
Focus: Expand your highlighting skills to advanced scenarios: performing a full head highlight efficiently, using different foil placement strategies (such as staggered bricklay foils, baby lights vs. chunky highlights), and learning to avoid common issues like stripes or bleed marks.
Learning Resources:
Watch “Full Highlight Foil Placement Technique” by Wella Professionals educator (YouTube). This shows a modern approach to a full head of foils designed to achieve a blended blonde.
Also review Mirella Manelli’s “Foilayage in 20 Foils” video for creative placement ideas – even if we won’t limit to 20 foils, it’s insightful to see strategic placement for maximum impact.
Self-Learning:
Learn the concept of “bricklay pattern” – foils placed in a staggered manner (like bricks in a wall) to avoid any visible lines where foils meet. Sketch out on paper how you’d lay foils in a head: e.g. in the back, you might do horizontal foils up the back of the head, but in the next section, you offset them. Read up on Babylights (ultra-fine highlights placed densely for an all-over light look) vs. traditional highlights. Consider when to use each: babylights for subtle lift or very fine hair, traditional for contrast. Also note how to approach full-head highlight timing – often working back to front ensures even processing since front foils are last and hair there is finer (lifts faster).
Hands-On Practice:
Perform a simulated full-head highlight on a mannequin. Plan your sections: back (nape to crown), sides, top mohawk. Try a bricklay pattern: in the back, do one foil, next foil above it split the gap, etc. Practice doing very fine babylight weaves around the face (hairline) for a soft blend, and maybe slightly thicker weaves in the interior for brightness. Pay particular attention to foil folding and saturation near the scalp – press the lightener into the foil but don’t over-saturate to where it may leak. Also practice the “hot cross bun” sectioning (4 quadrants) method: some stylists foil each quadrant to manage a full head logically. See which feels comfortable. The goal is by the end of this practice, you’ve placed 30-50 foils neatly in a head – a typical full highlight amount.
On-Site Model Day (Tue):
Tackle a more extensive highlight service on a model. If a full head is too time-consuming, do a 3/4 head (everything but the very bottom nape) – common in salons for clients who wear their hair down. Execute the plan you practiced, but be ready to adapt – perhaps your model’s hair is very thick, so you choose to weave slightly larger sections to keep a reasonable number of foils. Work on pacing: check the first foils you put in for lift while you’re still foiling the last sections; you might need to rinse the back foils sooner if they’re ready (with mentor’s help). This staggered processing is common in real full highlights. After processing, assist with toning the highlights as needed (toning technique detail is next week, but you can start observing the process).
Reflection:
A full highlight is a major service – reflect on your endurance and focus. Did your sectioning stay neat throughout, or did it get messier as you got tired? How about foil consistency at the end vs beginning? Identify any foil bleeding or uneven lift issues and their cause (often foil slip or uneven product application). List strategies to improve: e.g., “Remember to fold foils snugly at the scalp to prevent slipping” or “Take smaller sections in coarse hair for better saturation.” Also note how you balanced speed vs precision; as you gain experience, you’ll naturally get faster, but always prioritize doing it right.
Additional Speed & Efficiency Benchmark: By Week 16, aim to place a partial highlight (about 15–20 foils) in under 40–45 minutes, focusing on neat application and consistent weaves.
Week 17: Balayage & Freehand Painting Techniques
Focus: Learn the art of balayage – freehand hair painting – to create soft, blended highlights and sun-kissed effects. Balayage is about surface painting for a gentle gradation, differing from the uniform lift of foils. You will practice proper hand painting technique and sectioning for balayage, as well as how to choose between balayage vs foils for a desired look.
Learning Resources:
Watch “Balayage Basics 101” by Kenra Professional. Mirella Manelli demonstrates how to mix and use a clay-based lightener, how to sweep the brush for a seamless blend, and the sectioning for a standard balayage (usually V-shaped application on sections).
Also watch “Super Simple Balayage Hair Tutorial” on YouTube (a popular stylist shows a straightforward open-air painting on a mannequin). Observe the body positioning and wrist motion – painting lightly at midshaft and heavier toward the ends.
Self-Learning:
Understand the key differences from foiling: balayage typically uses thicker, clay-based lightener that hardens on the outside (to prevent transfer) and doesn’t use foils or meche, which means slower, more subtle lift. It’s great for a lived-in look and easier upkeep. Note the typical balayage section: take a triangular section, hold it tensioned, paint on the surface in a V shape (leave depth in the interior). Study how to saturate the ends fully (for brightness) but feather softly near the roots. Write out a generic game plan for a full-head balayage (e.g., part hair in half, work from the nape up in diagonal sections, etc.). Also consider the situations where you’d choose balayage: client wants low-maintenance, natural highlights, not all the way to scalp, etc.
Hands-On Practice:
Prepare a mannequin (ideally level 6–7 hair for visible effect). Mix a fake “balayage bleach” (you can use conditioner thickened with flour or something to mimic consistency). Section the hair into quadrants. Start at the back: take a diagonal slice, lay it over a board or your hand, and practice painting a V-shape – lighter saturation toward the ends. Work up the back with diagonal-back sections. On the sides, do diagonal sections that frame toward the face. Practice different strokes: a sweeping motion for feathering and a heavier painting at mid-length to ends. If using real lightener on a mannequin, keep it damp to simulate – although mannequins may not show the best results, it’s about practicing hand control. Also practice isolating painted strands with plastic wrap or cotton if you want to prevent bleeding on underlying hair.
On-Site Model Day (Tue):
Perform a partial balayage on a model (perhaps just the top layer and face-frame). It’s often useful to combine with a few foils for brightness, but since this week is balayage focus, you can do it pure. Explain to the model the benefit – softer grow out. Apply the balayage with mentor guidance – they can help adjust your pressure (common beginner mistake is either too light = no lift, or too heavy = splotchy). Monitor processing – balayage might need more time or heat since it’s open air. Rinse and tone the balayage if it lifted to a warm level that needs refining (toning technique detail is next week, but you can assist now).
Reflection:
Balayage requires a “feel” that comes with practice. How did you find the transition from structured foiling to freehand? Note in your journal the hardest part – e.g. “getting even saturation” or “knowing how high up to paint.” Also reflect on the outcome: did you achieve a soft blend or do you see harsh lines? If lines, you may need to feather more at the transition. If it’s too subtle, maybe heavier saturation or smaller sections next time. Write down scenarios where you think balayage is ideal and where foils might still be better – understanding this will help you consult clients effectively.
Detailed Step-by-Step Process: Basic Balayage
Mix Lightener
Use a clay-based lightener if available.
Aim for a thick consistency (“Greek yogurt”) so it stays on the surface.
Sectioning
Often parted down the middle, then split into 4–6 panels.
Work from the nape upward in diagonal sections if you like.
Painting Technique
Pick up a section, hold it with tension.
Lightly paint the surface midshaft, creating a V or W shape, saturating heavily on the ends.
Feather near the roots for a soft transition.
Isolate
Use cotton or plastic wrap under the painted sections if needed to prevent bleeding.
Keep sections separate if you’re layering them.
Process
Check every 10–15 minutes.
Clay lighteners can take longer to lift.
Rinse & Tone
Once you reach the desired lift, rinse thoroughly.
Apply a toner if necessary to refine the tone.
Style
Blow-dry and observe the blend.
The transition should look seamless from root to lighter ends.
Client Education
Explain how balayage grows out softly, requiring fewer touch-ups.
Suggest using color-safe or toning shampoos to maintain vibrancy.
Week 18: Blonding & Global Lightening (Bleach and Tone)
Focus: Tackle full blonding processes – bleaching hair to a very light level and toning to achieve the final blond shade. This includes learning how to do a “bleach and tone” (on scalp lightener for a platinum blond) and understanding how to safely lift through multiple levels while maintaining hair integrity.
Learning Resources: Watch “Brown to Blonde Hair Transformation MAJOR COLOR CORRECTION TO NATURAL PLATINUM BLONDE” Mirella Manelli · YouTube. Step-by-step color-correction from a Level 3/4 brunette base to a natural, even platinum blonde in one session.
Also watch “Perfect Blonde Hair – Bleach & Tone + Shadow Root” by Kenra/Wheeler to see an example of lifting then toning with a root shade for a dimensional blond – a common salon approach for a more natural look.
Self-Learning:
Review the hair lightening curve: black/brown goes red -> orange -> yellow -> pale yellow as it lightens. Make note: pale yellow (inside of banana) is the target for a platinum, which then needs a violet-based toner to become white. Understand the risks of bleach on scalp: potential irritation, the need to work fast and not overlap onto already lightened hair (to prevent breakage). Jot down important tips from the videos or readings, like adding Olaplex or a bond builder to bleach (we have K18/Olaplex in Week 21 but mention now that these can be used to mitigate damage). Also understand when to do a bleach & tone: typically when highlights aren’t enough and client wants all-over blonde, or to correct hair that has multiple bands of color by evening it out with bleach then toning.
Hands-On Practice:
Practice a virgin bleach application on a mannequin (with dark hair if possible). Mix a pretend lightener (or real if you have one and a safe space). Section hair into four quadrants. Starting 1/2 inch away from the scalp, apply bleach from mid-lengths to ends on thin subsections (this is because the root processes faster from body heat). Do this throughout all sections. By the time you finish, go back and apply bleach to the roots (starting where you began the mids application). This staggered approach helps even lifting. Of course on a mannequin result may not matter, but practice the method and speed. Then simulate checking the development – see if some areas dry out; in real life you may remix fresh bleach for roots or keep it moist. Practice the concept of a “platinum card” – which is basically putting every piece of hair in foil with bleach for maximum lift; you can simulate on a small section to get a feel for saturation needed.
On-Site Model Day (Tue):
Work on a blonding scenario. Perhaps do a roots bleach retouch on a blonde model whose roots have grown (commonly 4-6 week regrowth bleach touch-up). Under mentor supervision, mix on-scalp lightener (likely 20vol with Olaplex if used) and apply quickly to only the new growth, carefully not overlapping into previously lightened hair. Time it and rinse when at the pale yellow stage. Then you’ll mix a toner (with mentor help in choosing formula) and apply to achieve the final tone – e.g. a violet-based toner for a cool blond or perhaps a beige. Rinse and style gently (post-bleach hair is delicate – use good conditioner). If a full bleach isn’t available, you might do a big color correction using bleach on lengths to remove old dye – also a valuable learning experience under mentor guidance.
Reflection:
Going all-over blonde is one of the most challenging chemical processes. Reflect on the results: did the hair lift evenly? Any hot roots (roots lighter than lengths) or dark band? Discuss with your mentor what caused any imperfections (for example, applying bleach to scalp too early can cause hot roots; overlapping can cause breakage or brighter spots). Note down the toning formula used and why – toners are crucial after bleaching. Also assess the hair’s condition – did it feel compromised? That’s where Week 21’s treatments will come in. Write a brief plan for how you would maintain an all-over blonde client’s hair health (like recommending treatments, not over-shampooing, using purple shampoo, etc.).
Detailed Step-by-Step Process: Bleach & Tone (Virgin Application)
Section into Quadrants
Use four neat sections.
Clip each securely.
Mid-Lengths & Ends First
Mix bleach with the chosen developer (e.g. 20vol).
Apply 1/2 inch away from scalp to about 1–2 inches from ends if ends are porous.
Work quadrant by quadrant with thin subsections for even saturation.
Roots Second
Once mid-lengths and ends are half processed (or once you’ve finished all sections), go back and apply bleach to the roots.
Body heat accelerates root lift.
Ends
If ends are very dark or previously colored, you may need to reapply or use a higher developer last.
Monitor carefully.
Check Consistently
Open a few sections to see how the lift is progressing.
If certain areas reach pale yellow first, you can rinse them or remove bleach with cotton.
Rinse & Shampoo
Once everything is at pale yellow, rinse thoroughly.
Shampoo gently to remove residue.
Tone
Mix toner with developer (usually 10vol or a dedicated toner developer).
Apply from roots to ends or do a root shadow first, then pull through ends.
Process per instructions (5–20 minutes typically).
Rinse, Condition & Style
Rinse out toner thoroughly.
Apply a conditioning or bond repair treatment.
Style gently, using lower heat if possible.
Evaluate & Record
Assess the final blonde tone and condition.
Document formula, time, and any challenges for next time.
Week 19: Creative Color & Fashion Shades (Vivids)
Focus: Explore vivid fashion colors (e.g. pink, blue, purple) and creative color placement. This week you learn how to pre-lighten hair as a canvas for vivids, apply semi-permanent vibrant dyes, and even try color-melting techniques. It’s about creativity, but also understanding the maintenance and fade of these colors.
Learning Resources:
Watch “101: Learning the Basics of Color Melt | Kenra Color” (by Kenra Professional). This tutorial provides a comprehensive, step-by-step demonstration of the color melt technique, guiding viewers through the process of blending one hair color seamlessly into another. It includes professional tips on sectioning, product application, and achieving smooth transitions for a flawless, gradient effect.
Watch “Red Copper Hair Color Transformation | How to do a Color Melt with Permanent Color (easy technique!)” by Jamie Dana. In this tutorial, Jamie Dana demonstrates how to achieve a vibrant red copper hair transformation using a color melt technique with permanent hair color. She provides step-by-step guidance on sectioning, application, and blending to create a seamless transition between shades. This video is ideal for stylists looking to master color melt techniques with permanent dyes.
Self-Learning:
Review the difference between oxidative color and direct dyes: Most vivids are direct-deposit dyes that don’t use developer, and they fade with each wash. They require a very pale blonde base for true vibrancy. They fade faster than traditional permanent color, so clients must be aware of upkeep. Note important prep steps: hair often needs to be lifted to at least level 9 or 10, and sometimes toned to neutral before applying a pastel shade (e.g., tone out yellow if doing blue hair to avoid green tinge). Write down safety measures to avoid unwanted mixing: use foil or meche to separate sections if doing multiple colors, apply a barrier cream between color bands if needed, and always rinse with cool water. Brainstorm creative placements: global vivid vs peekaboo panels vs tips only.
Hands-On Practice:
If you have colored hair swatches or wefts, this is great – you can paint them with fantasy colors (using actual semi-perm vivid dyes if available, or even dilute acrylic paints as pretend). If not, use a mannequin that you pre-lightened on Week 18 or any light-hair mannequin. Plan a creative color design: for example, a pink and purple blend. Section the hair (maybe a horseshoe parting) and plan which parts get which color. Apply the vivid colors with a tint brush or gloved hands. Practice blending two colors in one strand by overlapping in the middle and combing or “smudging” with fingers. Also practice laying colored sections in foil to prevent them touching others. Let it sit (imagine processing 20 minutes). If using real dye, rinse each section separately in cold water.
On-Site Model Day (Tue):
Perform a vivid color service on a model. It could be something like adding a peekaboo panel of blue under their hair or doing a dip-dye of ends in a fun color. Likely the model’s hair needs pre-lightening first – you might coordinate with Week 18’s bleach practice for this. Once the hair is light enough and ideally toned to neutral if necessary, apply the chosen vivid. Use techniques from the resources: e.g., if doing two-tone hair, apply darker shade at roots, lighter on ends, and blend midshaft. Have your mentor check saturation – vivid color should be heavily applied to fully soak hair sections for even result. After full processing, rinse each section separately with cold water (this prevents colors from mixing). Dry and style gently (lower heat) and do a “reveal” – fashion colors are exciting for clients to see!
Reflection:
Creative colors are high-impact but also high-maintenance. Reflect on the result: is the color vibrant and even? Any spots that are patchy (could indicate uneven pre-lightening or application)? Did any colors unintentionally mix? Think about how you’d correct that next time (maybe more foils or rinsing adjustments). Also plan what to tell clients about upkeep: e.g., wash in cold water, use sulfate-free shampoo, refresh every 4-6 weeks, etc. Write down in your journal the longevity expectations of different colors (reds fade fastest, blues can stain longer, etc.). Also note your feelings – creative coloring is quite artistic; did you enjoy the freedom or find it unpredictable?
Week 20: Color Correction Fundamentals
Focus: Tackle the basics of hair color correction – situations like fixing uneven color, removing unwanted tones (brassiness, green tinge), or transitioning a client from one color to another. Learn a systematic approach: “Assess, Plan, Execute, Assess again,” and techniques like color removing, tint-back, and filling.
Learning Resources:
Watch “Professional Color Correction – Red to Blonde in 3 Hours” (Bleach Daddy on YouTube). This is a case study of correcting a vibrant red to a blonde, illustrating multiple steps (lighten, tone, etc.).
Also view “4 Easy Tips for Color Corrections” (by stylist Guy Tang or similar), which covers principles like breaking up the process, not rushing, and the importance of test strands.
Read the Wella blog article “How to Do the Perfect Color Correction” – it lists tips: thorough consultation, understanding underlying pigment, mixing direct dyes vs oxidative removal, etc.
Self-Learning:
Note the most common correction scenarios: removing excess warmth, going darker evenly (tint-back) which requires “filling,” or fixing patchy color. For filling, when hair is over-lightened and you want to go brown, you must put back red/gold tones first so the brown doesn’t go green or hollow. Also recall that direct dyes (like vivid stains) often need color removers or bleach wash. Write down the concept of “work in stages”—rarely is a big correction done in one shot.
Hands-On Practice:
It’s hard to simulate a full correction without multiple steps, but try a mini scenario on a mannequin or swatch: e.g., take a light blonde swatch and “tint back” to natural brown by first applying a warm filler, then a neutral brown. Or simulate removing off-tone with a bleach wash. The key is practicing the approach and timing, plus verifying results (test strand).
On-Site Model Day (Tue):
Ideally, have a model with a moderate color correction need. Under mentor supervision, do it in logical steps: maybe remove old dye with a color remover or bleach wash, then tone or re-color. Keep an eye on hair integrity—if it’s compromised, proceed gently or in multiple sessions. After each step, assess if you reached the target or need more adjusting.
Reflection:
Corrections can be unpredictable. Document everything: formulas, timings, brand of color remover, etc. Manage client expectations—some transformations can’t happen safely in one visit. Note your biggest learnings (e.g., how bleach wash lifted, how you neutralized leftover orange). This is advanced color training in real time.
Detailed Step-by-Step Process: Basic Color Correction Approach
Assessment
Thoroughly inspect the hair’s current color, condition, and history.
Identify the underlying problem (bands, unwanted tone, patchiness).
Test Strand
Take a small hidden strand.
Apply your proposed formula or process.
Evaluate results before committing.
Fill or Remove
If going darker on porous blonde, fill with missing pigments (warm tones).
If removing color, choose bleach wash or color remover as needed.
Gradual Approach
Work in stages rather than trying to fix everything with one step.
Rinse and reassess after each step.
Tone or Re-Color
Once the hair is at a workable canvas, apply your target shade.
Check for uniform coverage.
Hair Integrity
Watch the hair’s elasticity and porosity.
Involve bond builders or do partial corrections if needed.
Style & Final Check
Dry hair to see the final tone accurately.
Adjust with additional toning or lowlighting if needed.
Educate & Plan
Explain realistic outcomes to the client.
Book follow-up sessions if partial improvement is all that’s possible today.
Record everything.
Week 21: Hair Treatments & Bond Repair (Olaplex/K18)
Focus: Learn to maintain and improve hair integrity with professional treatments. This includes bond-building treatments (like Olaplex No.1/2 or K18 peptide treatment) and deep conditioning services. You’ll understand when and how to use these, especially after chemical services, and how to sell their benefits to clients.
Learning Resources:
Read Olaplex’s educational brief on how their bond multipliers work (rebuilding disulfide bonds broken during bleaching).
Also watch “Olaplex vs K18 – Which is better?” on YouTube for a science-backed comparison.
Additionally, watch a salon demonstration of a Keratin Smoothing Treatment (e.g., Keratin Complex Treatment tutorial) to see how a formal treatment service is applied and finished (though keratin is more about smoothing frizz, it overlaps with the idea of hair treatments).
Self-Learning:
Review handbook Section 9 if it covers hair health and product usage. List the treatments available at Lux Lox: likely Olaplex stand-alone treatment, K18 mask, deep conditioning masks (moisture vs protein). Learn the steps for each:
Olaplex stand-alone involves No.1 (concentrate) added to water, apply for 5-10 min, then No.2 for 10 min, then rinse.
K18 involves shampooing, then no conditioner, applying K18 mask on towel-dried hair, waiting 4 minutes, and styling.
Also note how keratin smoothing differs chemically.
Hands-On Practice:
Perform an Olaplex treatment on someone (a friend or coworker) who has damaged hair. Follow the steps meticulously. Or practice the K18 routine. Also do a deep conditioning mask on a mannequin or model for comparison (like a moisture mask under heat for 15 minutes). Observe results.
On-Site Model Day (Tue):
If a client from a recent bleach service is open, offer an Olaplex or K18 add-on. Walk them through the benefits. Show them the difference in hair feel post-treatment. Note if you see reduced breakage or improved manageability.
Reflection:
Record feedback from the client (did they notice improved softness or less tangling?). Note how you’ll incorporate treatments in your standard color services. Emphasize that healthy hair yields better color results—and that in-salon treatments plus recommended home care can be a consistent revenue boost.
Detailed Step-by-Step Process: Olaplex Stand-Alone Treatment
Clarify (Optional)
If hair has buildup, clarify first.
Towel-dry before application.
Mix Olaplex No.1
Typically 15 ml No.1 with 90 ml water (check updated guidelines).
Apply to damp hair, saturating thoroughly.
Process
Leave on for 5–10 minutes.
Do not rinse.
Apply Olaplex No.2
Apply from roots to ends over No.1.
Comb through for even distribution.
Leave for an additional 10–20 minutes.
Rinse, Shampoo & Condition
Rinse out thoroughly, then shampoo and condition as usual.
Style hair gently.
Assess Results
Check if hair elasticity improved.
Ask the client how it feels.
Recommend Home Care
Suggest Olaplex No.3 or similar for weekly maintenance.
Week 22: Smoothing & Chemical Texture Services
Focus: Learn about chemical texture services: smoothing treatments (like keratin treatments, Brazilian Blowout) and basic knowledge of permanent waves (perms). While our salon may primarily do smoothing, understanding perm basics is useful so you can consult knowledgeably. Emphasis is on performing a keratin smoothing treatment, as it’s a common high-end service.
Learning Resources:
Watch “Salon Keratin Treatment Step-by-Step | Kerasilk” by Goldwell. This demonstrates the procedure: clarifying shampoo, application of keratin solution in small sections, processing, blow-drying the solution in, then flat ironing extensively to seal it.
Also watch a modern perm video, e.g. “Digital Perm Makeover” or “Basic Perm Rod Placement 101” just to see how rods are rolled and solution applied – even if you never do one, you should grasp the concept.
Self-Learning:
Understand the chemistry differences:
Smoothing treatments (keratin-based): infuse keratin and use formaldehyde or derivatives to hold hair in a straighter state, lasting a few months.
Perms: break and reform disulfide bonds for a permanent wave.
Note aftercare guidelines: no washing or pulling back hair for 72 hours with keratin; no washing or tight styling for 48 hours with perms. Safety: good ventilation for keratin treatments.
Hands-On Practice:
If the salon has a keratin sample kit, do a mock smoothing treatment on a mannequin or friend with frizzy hair. Clarify, apply solution in small sections, blow-dry, flat iron. For perms, practice rolling rods on a mannequin. Even if you don’t apply solution, get comfortable sectioning and tension.
On-Site Model Day (Tue):
Assist or perform a keratin treatment on a client if possible. Follow each step meticulously. Alternatively, if a client wants a perm, help with rod placement and timing. Gather real feedback on how the hair transforms, how the client experiences the process, and what results you can promise.
Reflection:
Chemical texture services can be big revenue generators. Reflect on your comfort level. Which method do you prefer or need more practice in? Keep hair integrity front and center—overly processed hair can break. Summarize your learning in your journal.
Week 23: Introduction to Extensions & Tape‑Ins
Focus
Understand all extension methods at a high level, then master tape‑in extensions: from consultation through application, maintenance, and client education.
Learning Resources
Watch Glam Seamless – Tape‑In Extensions Tutorial (YouTube). Demonstrates product types, sectioning patterns, sandwich‑style application, and sealing technique.
Watch DreamCatchers – Tape‑In for Thick/Dense Hair (YouTube) Shows special considerations for coarse textures, blending, and row staggering.
Watch Bellami Hair – Beginner’s Guide to Tape‑In Application (YouTube) Breaks down parting lines, subsection thickness, tape placement, and tension checks.
Self‑Learning
Extension Method Chart: Create a 1‑page matrix contrasting tape‑Ins, K‑tips, I‑tips, and wefts: tools, wear time, ideal hair type, removal method, maintenance interval.
Color‑Match Drill: Using brand swatch rings (or online mock‑ups), pick 3 extension shades to blend with sample photos of different hair (e.g., ash‑brown base + warm highlights).
DIY “Tape” Practice: On a mannequin, use painter’s tape to simulate 10 sandwiches:
Part into 2 horizontal rows (nape, mid‑head).
Use ¼″ subsections, place “weft” strip under, “weft” over, press firmly.
Practice staggering rows to avoid vertical lines.
Consultation Script: Draft key questions:
“What length/volume are you seeking?
“Describe your daily styling routine.”
“How committed are you to maintenance?”
Follow with your recommendation (“Tape‑ins last 6–8 weeks, require no heat…”)
On‑Site Practice
Observation (30 min): Shadow a senior stylist’s tape‑in install. Note:
Parting: Clean, straight, 1″ between rows.
Subsection: Ultra‑thin (translucent) for secure adhesion.
Placement: ¼″ from scalp, avoid hairline/cowlicks.
Hands‑On Install (60 min): Under mentor supervision, install 10 tape‑Ins on a mannequin or consenting model:
Step 1: Clarify & fully dry hair (no moisture).
Step 2: Section into 4 quadrants, clip top sections away.
Step 3: Starting at nape, take a ¼″ slice, remove backing, place bottom tape under hair, press gently.
Step 4: Peel top tape, sandwich hair, press firmly (10 sec) with fingers or pliers.
Step 5: Perform a tension test: gently tug—hair moves, tapes stay put, no scalp discomfort.
Sealing & Quality Check: Ensure every sandwich has no stray hairs in the adhesive.
Maintenance Demo (15 min): Watch removal using a professional tape‑In remover:
Saturate tape edge, wait 1–2 min for bond to loosen, peel apart slowly.
Client Role‑Play (10 min): Explain after‑care:
“Please wait 48 hrs before shampooing so the adhesive fully cures. Use sulfate‑free shampoo, avoid conditioner on the tapes, and brush gently 2–3 times daily starting at ends, working up.”
Detailed Step‑by‑Step Process: Tape‑In Extensions
Prep (5 min): Shampoo with clarifier, towel‑dry, then blow‑dry to 100% dry.
Section (5 min):
Horizontal part at nape (1″ width).
Clip remainder; create parallel rows every 1″.
Subsectioning (2 min per sandwich):
Fine ¼″ slice, comb straight.
Application (2 min per sandwich):
Peel bottom tape backing, slide adhesive under hair.
Peel top tape, sandwich hair, press edges.
Pressing (10 sec each):
Use flat pliers or fingertips, apply even pressure.
Tension Check (1 min):
Tug each sandwich—secure but no tug on scalp.
Cleanup (5 min):
Remove any stray tape remnants, style.
Timing Benchmark: Full head (~50–60 sandwiches) in ~90 min with practice.
Reflection / Goals
Challenge: Which step felt least precise? (e.g., parting, sandwich alignment.)
Goal: “Achieve 5 perfect sandwiches in 10 min with zero slippage.”
Quiz Yourself:
Why space ¼″ from scalp? (Allows growth/outgrowth flexibility.)
When is maintenance due? (6–8 weeks.)
Week 24: K‑Tip (Fusion) & I‑Tip (Micro‑Bead) Extensions
Focus
Master individual‑strand methods: K‑tips (keratin fusion bonds) and I‑tips (micro‑bead attachments). Emphasis on section precision, tool handling, bond/bead security, and client safety.
Recommended Video: “LEAST DAMAGING HAIR EXTENSIONS // BELLAMI KERATIN TIPS” – This tutorial (by Salon 124 Group, featuring Bellami hair extension specialists) demonstrates a full installation of Bellami keratin bond (K-tip) extensions. The educator shows how to section the hair and use a Bellami fusion iron at the proper temperature to safely melt the keratin bonds onto small hair sectionsbellamiprofessional.com. You can see close-ups of the keratin application, how each melted bond is rolled between the fingers to seal it, and then held to cool for a secure attachment. Throughout the video, the stylist emphasizes damage prevention – for example, leaving a small gap from the scalp so the bonded extensions have free movement and don’t cause tension on the rootsbellamiprofessional.com. This official-style Bellami method tutorial covers all key steps (sectioning, bond placement, rolling and cooling) with professional tips to ensure a long-lasting, virtually undetectable result.
Great Lengths – Fusion Extension Demo
Recommended Video: “Great Lengths Education Series – Classic Fusion Application” – YouTube link: youtu.be/sxTOpU_Pf58. This is an official Great Lengths tutorial (from Great Lengths UK & Ireland’s channel) demonstrating the classic keratin fusion bond installation step by step. It highlights the use of the Great Lengths 3200 thermal applicator tool, which operates at a controlled low heat (about the same as the lowest setting of a curling iron) to soften the keratin bondgreatlengths.nyc. The stylist shows how to protect the client’s scalp by using a sectioning shield and attaching each pre-bonded extension just below the roots – this ensures the bonds are comfortable, secure, and allow full range of motion for the hairgreatlengths.com. You’ll see the correct bond formation technique: after heating, the Great Lengths keratin bond is wrapped and rolled around the small section of natural hair, forming a neat, cylindrical bond that is durable but not damaginggreatlengths.nyc. The video places special emphasis on safe heat application (to avoid overheating the keratin or hair) and proper bond placement, using only Great Lengths–branded tools and methods throughout. It’s a clear, professional demonstration of Great Lengths’ approved fusion procedure, including tips on sectioning, bonding, and protecting the hair and scalp during the process.
DreamCatchers – I-Tip Install & Move-Up
Recommended Video: “I-tip Hair Extensions Tutorial – Full Install by DreamCatchers Head Educator Dorothy” – In this comprehensive video, DreamCatchers’ head educator Dorothy walks through a complete I-tip (micro-bead) extension installation using official DreamCatchers tools and techniques. The tutorial covers bead selection in detail – Dorothy explains how to choose the proper size and color of micro-cylinder (bead) for the client’s hair type, using smaller DreamCatchers cylinders on finer or fragile sections (like the temple area) to prevent excess weight or stress on the hairdreamcatchers.com. She demonstrates how to use the loop threading tool to pull small sections of the natural hair through the bead, then inserts the I-tip extension strand. The video shows the three-press crimping method with the DreamCatchers clamp: the educator crimps each bead three times (in different directions) to securely lock the extension in place, ensuring it won’t slip but without damaging the hair. Importantly, this tutorial also addresses the maintenance (“move-up”) process required after about 4–6 weeks of wear. Dorothy discusses scheduling regular adjustments and shows how to reopen the micro-beads and slide the extensions back up toward the scalp to relieve grown-out tensiondreamcatchers.com. By following the DreamCatchers move-up guidelines (typically every 4–6 weeks for I-tips), the stylist keeps the client’s hair healthy and the extensions reusable. This high-quality video is recent, well-filmed, and delivers professional instruction on both the initial I-tip installation and the proper maintenance technique, reflecting up-to-date best practices for the DreamCatchers system.
Self‑Learning
Bond Rolling Drill: On a mannequin or heat‑safe surface:
Heat a keratin grain with a hot‑glue gun tip (simulating fusion iron).
Roll grain into a neat cylinder, let cool, inspect uniformity.
Bead Threading Practice: Thread 20 beads onto fine hair/substitute strands with a loop tool—time and refine technique.
Method Comparison: Bullet out 5 pro/con points for K‑tips vs I‑tips (e.g., heat vs no‑heat; wear‑time; removal method).
After‑Care Sheet Draft: One‑page instructions specific to K‑tips and I‑tips (washing, styling, product avoidance).
On‑Site Practice
A. K‑Tip Fusion Bonds
Preparation (5 min):
Clarify & dry hair fully.
Section into bricklay pattern (nape→crown).
Application (3–4 min per bond):
Isolate a 1/8″ strand.
Position keratin tip beneath the strand.
Heat fusion tool to 180 °C (verify brand spec).
Clamp keratin for 3–5 sec, roll between finger guard & strand to form cylinder.
Let bond cool 10 sec, then tug‑test gently (secure, no slip).
Quality Checks:
Bond diameter ~ rice‑grain size.
Bond sits ¼″ from scalp, no stray hairs.
Pacing Drill:
Aim for 10 bonds in 25 min initially (full head ~120 in ~5 hrs).
B. I‑Tip Micro‑Beads
Preparation (5 min):
Clean, dry hair; section into bricklay pattern.
Application (1 min per bead):
Take a 1/8″ strand, use loop tool to thread bead + hair + I‑tip.
Position bead ¼″ from scalp, crimp with pliers: top, middle, bottom = 3 presses.
Tug‑test bead (no slip, no scalp pain).
Quality Checks:
Beads flush to head, no rotation.
Use silicone‑lined beads to protect hair.
Maintenance Drill:
Simulate move‑up of 5 strands: open bead, slide tip up, reclamp.
Detailed Step‑by‑Step Processes
K‑Tip Fusion Bonds
Section: 4 quadrants, horseshoe parting from ear to ear.
Subsection: Vertical slices ~1/8″.
Heat & Bond:
Fusion iron at target temp.
Place keratin under hair, clamp, hold 3–5 sec.
Roll bond away from scalp 360°.
Cool & Test: Let sit 10 sec, then pull gently.
Completion: Work up in staggered rows.
I‑Tip Micro‑Beads
Section: Similar to K‑tips.
Subsection: 1/8″ slices.
Threading:
Loop tool picks up hair + I‑tip + bead.
Slide bead to ¼″ from head.
Crimping: 3 even presses with pliers.
Test: Gently pull strand—secure, no pain.
Reflection / Goals
Reflect: Which method was easier/harder? Why?
Goal:
K‑tips: “Install 5 bonds in 12 min with zero slippage.”
I‑tips: “Thread & clamp 10 beads in 10 min reliably.”
Quiz:
Why cool a K‑tip before testing? (Prevents bond failure.)
How often move‑up I‑tips? (4–6 weeks.)
Week 25: Beaded Wefts, Blending, Aftercare & Removal
Focus
Learn beaded weft installation, seamless blending (cutting & styling), and complete removal & after‑care for all methods.
Bellami – Hand-Tied & Weft Extensions
Recommended Video:“BELLAMI WEFT HAIR EXTENSIONS TUTORIAL” - This tutorial provides a comprehensive walkthrough of installing Bellami's hand-tied weft extensions. It begins with creating a bead foundation, demonstrating precise sectioning and bead placement to ensure a secure base. The video then covers sewing the weft onto the bead foundation, highlighting techniques for a seamless and comfortable fit. Trimming and sealing the ends are also addressed, ensuring longevity and preventing fraying. Finally, the stylist showcases volume layering techniques to blend the extensions naturally with the client's hair, resulting in a voluminous and cohesive look.
Glam Seamless – Weft Installation Tips
Recommended Video:“ALL ABOUT HAND TIED/INVISIBLE WEFT HAIR EXTENSIONS” - In this informative video, the stylist delves into the differences between machine-tied and hand-tied wefts offered by Glam Seamless. The discussion includes the benefits of each type, such as the lightweight nature of hand-tied wefts and the durability of machine-tied wefts. Edge sealing techniques are demonstrated to prevent unraveling and extend the life of the extensions. Additionally, the video covers stacking strategies, showing how to layer multiple wefts for added volume and a more natural appearance. This tutorial is ideal for those looking to understand the nuances of weft installations and achieve a flawless finish.
Donna Bella Hair – Blending Extensions
Recommended Video: “BEGINNER: Blending & Shaping Donna Bella Tape-In Extensions” - This step-by-step tutorial focuses on blending Donna Bella Hair's tape-in extensions for a seamless look. The stylist begins by demonstrating layering techniques to match the client's natural hair length and density. Point cutting methods are then employed to soften the lines between natural hair and extensions, ensuring a natural flow. The video concludes with finishing curls, adding movement and cohesion to the overall hairstyle. This guide is perfect for stylists aiming to master the art of blending extensions for an undetectable and polished result.
Self‑Learning
Weft Sewing Drill: On fabric or mannequin braid, create a 4″ weft row:
Place beads every ¾″, stitch weft to beads (3 wraps/thread).
Cutting & Blending Practice:
Using clip‑ins, practice point‑cutting ends on a mannequin to blend two lengths.
After‑Care Guide: Finalize a consolidated 1‑page care sheet covering:
Washing (2–3×/wk)
Brushes (loop/boar‑bristle)
Products to avoid near bonds/beads/tapes.
On‑Site Practice
A. Beaded Weft Installation
Prep & Section (5 min): Clarify hair, horizontal part at nape.
Bead Placement (2 min per bead):
Thread bead + hair + weft edge, slide to ¼″ from scalp.
Clamp bead (2 presses) or sew weft with thread & curved needle.
Weft Finishing (5 min):
Trim weft ends to desired length; seal edges with extension glue (if machine weft).
Quality Check: Comb to confirm weft lies flat, no lumps.
B. Blending & Styling
Determine Length: Consult client, mark extension length.
Frame Face: Point‑cut front pieces to match client’s natural layers.
Connect Layers (10 min):
Vertical sections, use thinning shears at join.
Feather from natural hair into extension length.
Style: Curl or wave through both weft & natural hair to unify textures.
C. Removal (30–60 min)
For each method, follow these steps:
Tape‑Ins:
Apply professional remover along tape edge, wait 2–3 min.
Peel bottom tape, then top.
Shampoo clarifier to remove residue.
K‑Tips:
Apply keratin remover around bond, wait 2 min.
Use removal pliers to crack bond; slide off.
Gently comb to clear residue.
I‑Tips:
Clamp pliers to open bead (round to flat).
Slide I‑tip + hair out.
Remove bead, comb hair.
Wefts:
Cut thread at each bead seam (avoid hair).
Open beads (pliers), remove weft.
Shampoo to clear thread bits.
Reflection / Goals
Reflect: Which removal method required the most patience?
Goal:
“Complete a full beaded‑weft install + removal demo on a mannequin within 40 min.”
Checklist: Use a service run‑sheet covering:
Consultation & consent
Method choice & sectioning
Application steps
Blending haircut
After‑care instruction
Removal demo
Client Pledge: Summarize in one sentence how you’ll ensure damage-free extensions and client happiness.
🎉 Congratulations! You’ve now mastered every major extension method—tape‑ins, keratin bonds, micro‑beads, wefts—plus blending, after‑care, and removal. Continue refining these skills in your salon and watch your extension services elevate your styling career!
Week 26: Branding & Marketing Your Personal Brand
Focus: Shift into business mode—define your personal brand as a stylist and learn basic marketing strategies to attract clients. This includes establishing your brand identity (specialties, vibe, target clientele) and leveraging social media and online presence.
Learning Resources:🎥 Video: “How To Build Your Social Media as a Hairstylist” – Patricia Regan
In this insightful video, Patricia Regan shares her expertise on leveraging social media to grow your hairstyling business. She delves into strategies for creating engaging content, understanding your target audience, and maintaining a consistent posting schedule. Patricia emphasizes the importance of authenticity and building genuine connections with followers to foster a loyal online community. Whether you're new to social media or looking to refine your approach, this video offers practical tips to enhance your online presence.
📝 Reading: “Salon Branding: A Three-Step Guide for 2025” – GlossGenius
Blog Link: Read Article
This comprehensive guide from GlossGenius outlines a three-step approach to effective salon branding. It covers essential elements such as choosing a unique name and logo, developing a consistent aesthetic, and implementing cohesive marketing strategies. The article provides actionable advice to help beauty professionals stand out in a competitive market and build a recognizable brand identity.
🎧 Podcast: “Hairstylist Branding 101: Brand vs. Branding Explained” – Successful Stylist Academy
Apple Podcasts Link: Listen to Episode
In this episode, host Ambrosia Carey and guest Nina Kovner of Passion Squared delve into the nuances between 'brand' and 'branding' for hairstylists. They discuss how to define your brand identity, communicate your unique value proposition, and create a cohesive branding strategy that resonates with your target audience. This podcast offers valuable insights for stylists aiming to establish a strong and authentic brand presence.
Self-Study & Planning:
Define what sets you apart: Are you “The Blonde Balayage Specialist with a boho vibe” or “Precision Cutter and Extension Expert offering a luxury experience”? Write a short mission statement or tagline for yourself.
Design the basics of branding—a simple logo or color scheme for your Instagram/feed. Ensure you have a professional Instagram or portfolio page.
Plan content: aim to post 2–3 times a week showcasing your work.
Additional Retail Micro-Goal: This week, in alignment with establishing your personal brand, highlight one product in your social media posts that reflects your “brand identity.” For instance, if you market yourself as a “healthy hair” specialist, feature a bonding treatment or heat protectant.
Practical Assignment:
Set up or refine your Instagram business profile. Make sure your bio clearly states who you are, what you do, and where you’re located. Post at least one before-and-after with relevant hashtags (#balayageTemecula, #LuxLoxSalon).
If you haven’t, create profiles on booking sites like StyleSeat or GlossGenius. Start thinking about a simple business card design.
On-Site/Real-World Integration:
Talk to the salon’s marketing or front desk about how new stylists are featured. Possibly get a quick photoshoot of your work. If the salon has official brand guidelines, incorporate them. See how the salon handles online reviews or Yelp. This helps unify your personal brand with the salon brand if you plan to stay.
Reflection:
Branding is ongoing, but now you have the foundation. Reflect on your chosen direction—does it feel authentic? Decide which social platforms to focus on. Document a marketing plan outline: “Post 3x weekly on IG, start TikTok for short hair tips, network with local wedding planners,” etc. This structure guides your client-building efforts.
Detailed Step-by-Step Process: Setting Up a Stylist Instagram
Create Business Profile
Convert to a business or creator account.
Add a professional profile picture (your face or your logo).
Bio
State your specialty, location, and booking link.
Keep it concise and brand-aligned.
Photo Strategy
Aim for consistency in background or editing style.
Use the same filter or lighting for a cohesive feed.
Hashtags & Geotags
Use local hashtags (#YourCityHairStylist).
Tag your salon location.
Engagement
Reply to comments promptly.
Like and comment on other local businesses’ posts to network.
Stories & Highlights
Use IG Stories to show behind the scenes.
Create highlights for services, pricing, or transformations.
Call to Action
Include a “Book Now” link in bio or direct them to DM.
Use “Swipe Up” if you have that feature.
Post Consistently
Schedule or plan your posts weekly.
Track which posts get the most engagement to learn your audience’s preferences.
Retail Mentions
Occasionally show your favorite retail products in Stories or Reels.
Explain briefly how you use them during services.
Analyze & Adjust
Review your insights or analytics (available on business or creator accounts) to see when your followers are most active, which posts get the highest engagement, and where your audience is located.
Experiment with content types: reels, carousels, before-and-after shots, tutorials. Observe which format resonates best with your audience.
Refine your posting schedule based on engagement data—post more during peak activity times, and consider scheduling in-app or with a third-party tool.
Stay flexible and learn from each post’s performance. If a particular style of photo or caption garners more comments, lean into that approach. Continual optimization will help you grow your brand effectively.
Week 27: Client Retention & Customer Service Excellence
Focus: Learn strategies to retain clients and deliver exceptional customer service. Retaining loyal clients is more cost-effective than constantly seeking new ones. Develop habits for building relationships, encouraging rebooking, and providing a “WOW” experience.
Learning Resources:
Reading: “7 Salon Client Retention Strategies” (Minerva Beauty).
Video: “The BEST Method to Keep Your Salon Clients Coming Back” (YouTube, Salon Business Coach) focusing on tracking retention rates and elevating client experience.
Skills & Systems:
Implement a follow-up system: message or email new clients within 48 hours thanking them, then check in after 1–2 weeks.
Practice a script for rebooking: “Your color will grow out in about 6 weeks—shall we secure your next appointment now?”
Role-play handling a complaint gracefully (e.g., how to offer a redo, partial refund, or corrective service).
Operational Task:
If Lux Lox has a loyalty or referral program, learn it thoroughly. Encourage at least two clients to join or share with friends.
Keep notes on each client’s preferences (formulas, life events) so you can personalize the conversation next visit.
On the Floor:
Consciously elevate your service: greet by name, offer beverages, do a thorough consultation, walk the client to checkout, etc.
Have a mentor do a “secret shopper” style observation and give feedback.
Reflection:
Record what changed this week. Did more clients pre-book or mention feeling cared for? Note any slip-ups in service (maybe you got busy and forgot to re-offer water). Tweak your approach. Great service fosters loyal clients and word-of-mouth referrals.
Detailed Step-by-Step Process: Client Follow-Up
Collect Contact Info
Ensure you have permission to text/email.
Send Thank-You
Within 24–48 hours, text or email: “Thank you for visiting! How’s your hair feeling?”
Invite Feedback
Encourage them to let you know if they have any concerns or questions.
Midpoint Check
About 1–2 weeks in, send another quick message: “Checking in on your style/color—still loving it?”
Record
Keep track of who you followed up with, any notes.
Adjust
Adjust approach if you see patterns.
Week 28: Financial Literacy & Pricing for Stylists
Focus: Develop financial savvy—track your income/expenses, create a simple budget, set service prices, and manage taxes. Learn to read salon software reports for service and retail sales.
Learning Resources:
Templates: Review the salon’s financial tracking templates if available.
Reading: “9 Financial Planning Tips for Salon Owners” (American Salon).
Video: “How to Price Your Services for Profit” (Samantha Georgson on YouTube).
Money Management Tasks:
Set up a spreadsheet or app to log each service, tip, and expense.
Understand how your pay is calculated (hourly vs. commission).
Create a simple monthly budget of personal and business expenses.
Identify how many clients or how much revenue you need to cover costs.
Pricing Exercise:
Discuss with your mentor how pricing is set at Lux Lox.
Practice calculating your ideal hourly rate.
Write out a hypothetical service menu for yourself if you were independent, ensuring you account for product cost, time, and profit margin.
On-Site Integration:
Possibly help the salon manager with inventory or small ordering tasks to see how expenses add up.
Practice quoting a big service to a real client so you become comfortable stating higher prices for color corrections or extensive highlights.
Reflection:
Money can be intimidating, but it’s crucial for a sustainable career. Reflect on what you learned—do you see the value in budgeting and tracking? Are you comfortable discussing prices with clients? Summarize new financial habits (weekly expense tracking, monthly review). This ensures profitability as you grow.
Detailed Step-by-Step Process: Basic Service Pricing Formula
Calculate Your Hourly Rate Goal
E.g., you want $40/hr net after costs.
Estimate Product Cost
Add the cost of color, developer, foils, or styling products for that service.
Time Investment
Estimate how many hours the service takes (including consult, finishing).
Add Markup
Price = (Hourly Rate × Service Time) + Product Cost + Overhead Buffer.
Compare Market Rates
Check local stylists with similar experience.
Establish Final Price
Round up or create a tiered price range (short vs. long hair, single vs. double process).
Communicate Clearly
Be upfront with clients about the service total before starting.
Revisit Regularly
As you gain experience or speed, reevaluate.
Don’t be afraid to raise prices if costs or your skill level changes.
Week 29: Legal & Compliance (California Salon Laws & Employment Options)
Focus: Understand the legal framework—especially California cosmetology laws. Learn the differences between commission employment vs. booth renting, license renewal, sanitation, insurance, and relevant labor laws like AB5 and SB 490.
Learning Resources:
Reading: California Board of Barbering & Cosmetology regulations summary.
PBA Fact Sheet: Professional Beauty Association’s info on SB 490, plus a summary on AB5.
Salon Materials: Check in-salon guides for compliance (displaying licenses, sanitation protocols).
Discussion & Q&A:
If possible, speak with the salon owner or a guest speaker about legalities of booth renting vs. being an employee.
Clarify if the salon has a non-solicitation policy or if they handle scheduling.
Learn about liability insurance—often recommended even if you’re an employee.
Practical Steps:
Confirm your personal cosmetology license is current. Note its renewal date.
If you plan to booth rent eventually, compile a checklist (business license, insurance, tax ID).
For employees, confirm how wages, tips, and overtime are handled.
On-Site Experience:
Observe how the salon ensures compliance: license display, Barbicide usage, MSDS/SDS binder, etc.
If they do monthly or quarterly safety checks, see how they’re documented.
Reflection:
Legal aspects can feel tedious, but they protect you and your clients. Write a brief summary of how you’ll maintain compliance if you branch out on your own. Note any unclear areas (like city permits) for further research.
Detailed Step-by-Step Process: Staying Compliant in a Salon
License Display
Post your cosmetology license at your station or have it on hand per state board rules.
Sanitation
Follow state board rules for tool disinfection (Barbicide, UV sterilizer).
Keep a daily or weekly log if required.
Record-Keeping
Track services, income, and tips accurately for taxes.
If booth renting, keep receipts for rent, product costs, etc.
Renew License
Note expiration date.
Submit renewal forms/fees on time.
Know Labor Laws
If you’re an employee, confirm you get at least minimum wage or a guaranteed base.
Track hours to ensure correct overtime if applicable.
Insurance
If booth renting or independent, get professional liability insurance.
Verify whether the salon’s insurance covers employees fully.
Stay Updated
Laws can change; subscribe to CA Board newsletters or check their site periodically.
Week 30: Career Paths & Transition to Independence
Focus: Evaluate different career paths: staying as a salon employee, renting a booth, or owning a suite/salon. Also consider alternative paths like educator or platform artist. Plan your next steps after the assistant program, setting goals for building your business or career.
Learning Resources:
Podcast: “Commission vs Booth Rental – Which is Right for You?” (Thriving Stylist).
Reading: Interviews of stylists who opened their own suite or brand.
Ugly Duckling Color Blog: “Booth Rent vs Commission” for real stylist examples.
Self-Reflection & Planning:
Write a 5-year vision. If you see yourself as an independent, what do you need to launch successfully (client base, start-up funds)?
If you prefer a structured salon environment, ask how you can advance (Level 1 to Master Stylist). If you want to become an educator, see which brand or academy you might join.
Career Research Task:
Interview a booth renter and a commission stylist. Ask about pros, cons, daily routines, finances. Summarize your findings.
Action Steps:
If leaning toward booth rent, research local salon suites, note monthly costs, location convenience, potential competition.
If you want to remain employed, talk with management about your growth plan, continuing education, promotions.
Reflection:
Summarize your chosen path’s pros/cons in your journal. Identify any fears and how you’ll mitigate them (saving money, marketing more aggressively, etc.). A plan reduces uncertainty and energizes your final weeks in the program.
Week 31: Portfolio Building & Photography Basics
Focus: Create a professional portfolio of your work and learn how to photograph hairstyles effectively for marketing. By now, you should have many before-and-after photos from training—organize them, and practice taking crisp, well-lit pictures that showcase your skill.
Learning Resources:
Reading: “How to Photograph Hair for Instagram: 7 Pro Tips” (BehindTheChair).
Video: “Taking Before & After Hair Photos – Tips for Stylists” (Wholy Hair).
Also browse top stylists’ Instagrams for inspiration on angles and lighting.
Portfolio Curation:
Gather your best 10–15 images. Sort them by style or color technique. Decide if you’ll build a print portfolio or a digital one (Instagram highlight, personal website).
Remove low-quality or poorly lit images.
Photography Practice:
Invite a model or ask a friend with good hair to replicate a style from earlier weeks, then photograph it with a ring light or near a window.
Experiment with angles: back, side, close-up of color dimension. Try short videos for hair movement.
On-Site Integration:
If the salon has a dedicated photo area or ring light, get comfortable using it.
Coordinate with another stylist to photograph each other’s work.
Make sure you have client permission (photo release forms if salon policy requires them).
Reflection:
Compare your early photos to new ones. Notice improvements in lighting, angles, or styling. Write a checklist for photography: “Clean background, good lighting, consistent angle, part hair to show dimension, smooth flyaways.” A polished portfolio helps attract clients and proves your expertise.
Week 32: Final Capstone Presentation & Critique
Focus: Execute your final capstone project! Complete the chosen style(s) on your model(s), then present to peers and mentors, demonstrating concept-to-finish execution.
Execution
Finalize the Cut/Color/Style
On the scheduled day, complete the service as planned.
Keep your station tidy; have all tools and products ready.
If you’re doing a live demo, talk through your steps (e.g., “I’m blending this color at the root to create a soft transition.”).
If you’re doing a photo or slide presentation, include clear before-and-after images and any relevant step-by-step process shots.Adhere to Timing
Aim to follow your outlined schedule (for example, 2 hours for color application, 30 minutes for styling).
If you encounter unexpected issues (e.g., color not lifting evenly), adapt while staying as close to your plan as possible.
Presentation
Summarize your inspiration (e.g. “My theme is ‘Moonlight Garden’ with silvery tones and soft layering.”).
Explain techniques used: was it a double-process bleach, a layered haircut, a hand-painted balayage, an intricate braided updo, etc.?
Highlight challenges you faced: for instance, “We needed two bleaching sessions to safely lift from level 4 to level 10 without major damage.”
Tie it back to your personal brand or vision: “I specialize in healthy blonding, so Olaplex treatments were used throughout.”
Critique & Feedback
Expect questions from mentors or classmates: “Why did you pick that toner?” “How did you preserve hair health?”
Take notes on feedback; you may hear suggestions for alternative techniques, finishing products, or timing improvements.
Reflection
Celebrate—this is your capstone moment! Note what you excelled in and where you might want more practice.
Write a final self-assessment:
What went well?
Where did you get stuck or need mentor input?
How would you refine your approach next time?
Wrap-Up Having completed this final project, you’ve shown competence in cutting, coloring, styling, and professional presentation. Discuss with your mentor or salon management whether you are ready to transition to full stylist responsibilities or if you’d like to reinforce any areas. Use photos or videos from this capstone to boost your portfolio and social media—your best “final” transformations can attract new clients.
Weeks 33–36: Transition to Stylist – Client Building & Ongoing Education
(These final four weeks act as a soft launch into your stylist career, allowing you more autonomy while still receiving lighter mentorship.)
Week 33 – Begin Independent Client Work
Start taking your own clients on designated days. You may still assist senior stylists during peak times.
Emphasize rebooking—use your scripts learned in Weeks 25–26 to secure the client’s next appointment now.
Check in with a mentor or senior stylist if a complex color correction or advanced cut request comes in. They can shadow you as needed.
Week 34 – Independent Operations
Manage your own schedule more fully (booking clients, confirming appointments, etc.).
If you’re on commission, track your services and tips in a simple spreadsheet or app. If you’re considering booth renting, look into finalizing a lease or reviewing the salon’s booth rental agreement.
Set a quick meeting with your salon owner/manager for a progress check-in. Discuss service pricing, timing, or any client challenges.
Week 35 – Growth & Advanced Education
Continue client-building strategies:
Offer a small promotion (e.g., “Refer a friend and both receive 10% off your next service”).
Collaborate with local wedding planners or photographers if you enjoy bridal work.
Post frequently on social media, showcasing fresh transformations or behind-the-scenes.
Attend an advanced workshop/hair show (if available) to keep learning. Bring back new techniques or product knowledge to integrate into your services.
Week 36 – Final Evaluation
By now, you should feel comfortable balancing your client schedule, performing services independently, and continuing self-marketing efforts.
Your mentor or salon manager will do a final review of:
Service sales and rebooking rate
Technical skill execution
Retail recommendations and client feedback
Address any last-minute skill gaps (could be speed in highlights, or more practice with pixie cuts).
Officially graduate the Lux Lox Salon Advanced Training Program!
Make an announcement on your platforms: “Now accepting new clients as a Level 1 Stylist at Lux Lox Salon—book via [link].”
Celebrate your accomplishment—you’ve completed a rigorous 36-week transformation from new graduate to confident stylist.
Note on Ongoing Education
Even as you step into an independent stylist role, learning never stops. You might choose to pursue:
Advanced certifications in curly cutting, color correction, or extension methods.
Brand ambassador or educator roles if you love teaching.
Business/marketing courses to refine your promotional skills.
Staying updated on trends and techniques ensures you keep evolving—and your client base will grow with you.
Congratulations on Completing the Lux Lox Salon 36-Week Advanced Training Curriculum!
You now have a solid foundation in:
Advanced cutting (precision methods, short cuts, layered cuts)
Coloring expertise (Oligo products, gray coverage, highlighting, balayage, blonding, vivid creative color, color correction)
Styling (blowouts, iron finishes, formal updos, braiding, plus specialized curly/coily techniques)
Retail knowledge and client communication (consultations, rebooking, follow-ups)
Business-building (branding, social media, pricing, legal compliance)
Whether you stay at Lux Lox Salon or venture into an independent space, keep honing your craft. Explore new trends, stay updated, and continue exceeding client expectations. Your career path is wide open—stay curious, stay dedicated, and watch your confidence and clientele soar!